Building tools (CMake, MinGW, Visual Studio)
To build software on Windows, you can use a large variety of software. However, some tools are more popular than others. Here, I provide instructions to install three popular building tools on Windows:
Installing CMake
What is CMake?
CMake is a generic building tool, which creates compilation projects for a large variety of compilers / IDE. It somehow abstracts the process of generating compilation instructions and make it possible to configure a given project no matter what the actual compiler / building tool will be. For instance, it can generate Makefiles (to be used with GCC and similar programs, like MinGW) as well as Visual Studio projects.
According to the official CMake project website, “Cmake is cross-platform, open-source build system for managing the build process of software using a compiler-independent method”.
In particular, CMake offers the “out-of-sources” build feature, which is explained as: “When your build generates files, they have to go somewhere. An in-source build puts them in your source tree. An out-of-source build puts them in a completely separate directory, so that your source tree is unchanged.” (Source)
Installation instructions
Download the latest release of CMake at http://www.cmake.org/download/.
- Pick Windows (Win32 Installer).
- Run the installer.
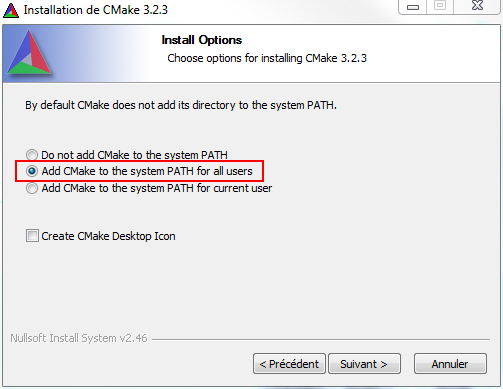
- When asked for, select “Add CMake to the system PATH for all users”.
- Run software installation.
CMake is now installed in the computer (by default in C:\Program Files (x86)\CMake x.x).
Note
The files there are the exact same copy of what you’d find by downloading the ZIP archive of the program on the CMake website.
Installing MinGW
What is MinGW?
In short, MinGW is a contraction of “Minimalist GNU for Windows”. Thus, it is a minimalist development environment for native Microsoft Windows applications (more info on http://www.mingw.org/). It is basically a port of GCC on Windows along with all the useful tools accompaying GCC, the GNU Compiler Collection.
Detailed installation instructions are available at here. This tutorial will provide you with step-by-step instruction to install MinGW on Windows. The idea here is that we’ll install some sort of a package manager to manage the installation of the different parts of MinGW.
Note
Aside from MinGW, which is 32-bit and cannot produce 64-bit programs, there is also MinGW-w64, which supports both 32-bit and 64-bit compilation on Windows. However, MinGW being more popular than MinGW-w64, I will use MinGW here.
Installation instructions
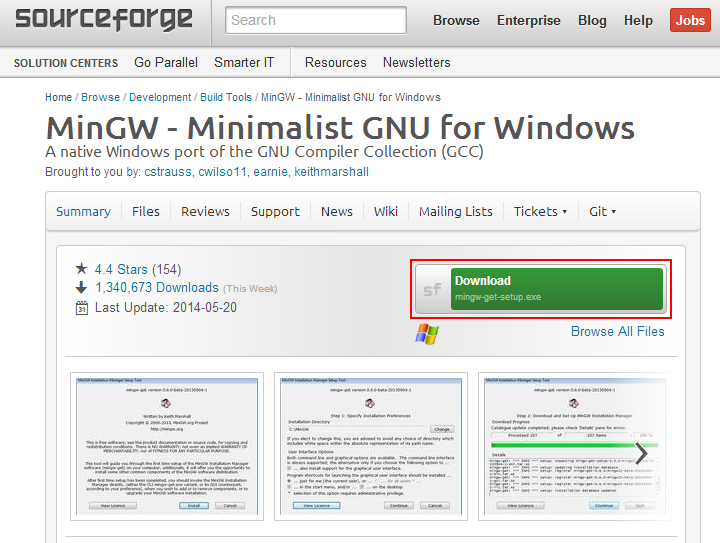
Go to http://sourceforge.net/projects/mingw/ and download the installation program of MinGW (“mingw-get-setup.exe”).
Run the installer and press “Install”.
Keep all options default (in particular, it is not advised to install MinGW for all users and I strongly advise you to install the GUI tool).
When installation is done, press “Continue”.
The MinGW Installation Manager starts automatically.
Note
If you pressed “Quit” instead of “Continue” at the end of the installation, don’t worry: you can launch the MinGW Installation Manager from the Start Menu.
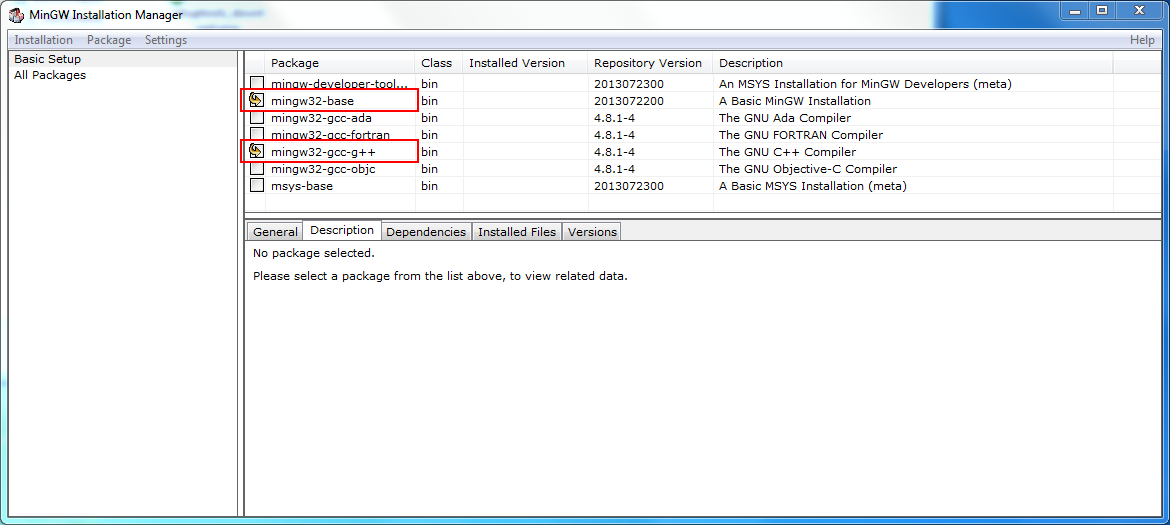
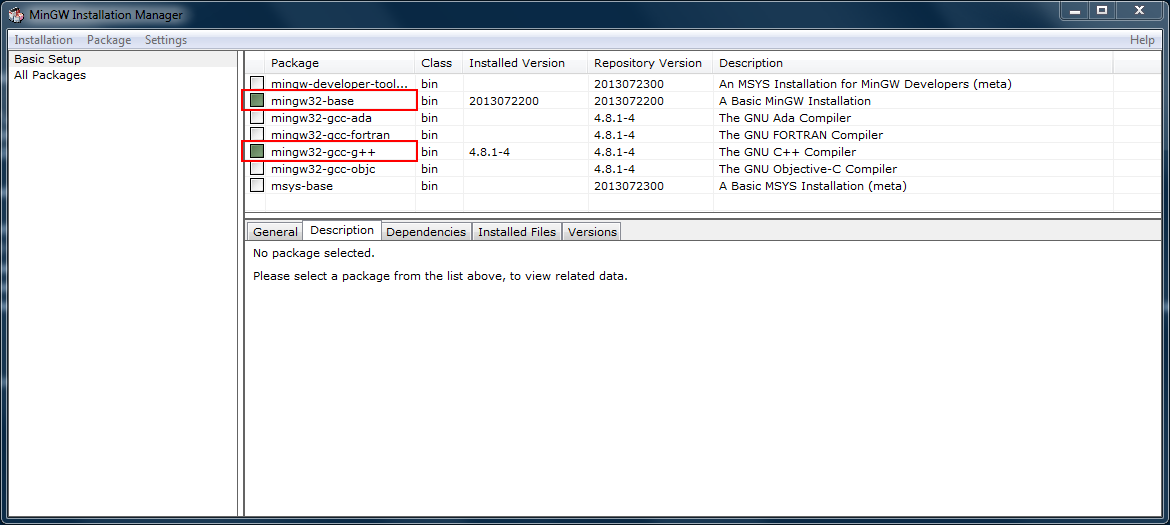
On the left-hand pane, select “Basic Setup”.
On the right-hand pane, select “mingw32-base”, and select “Mark for Installation”.
Do the same for the “mingw32-gcc-g++” package to be able to compile C++ code as well.
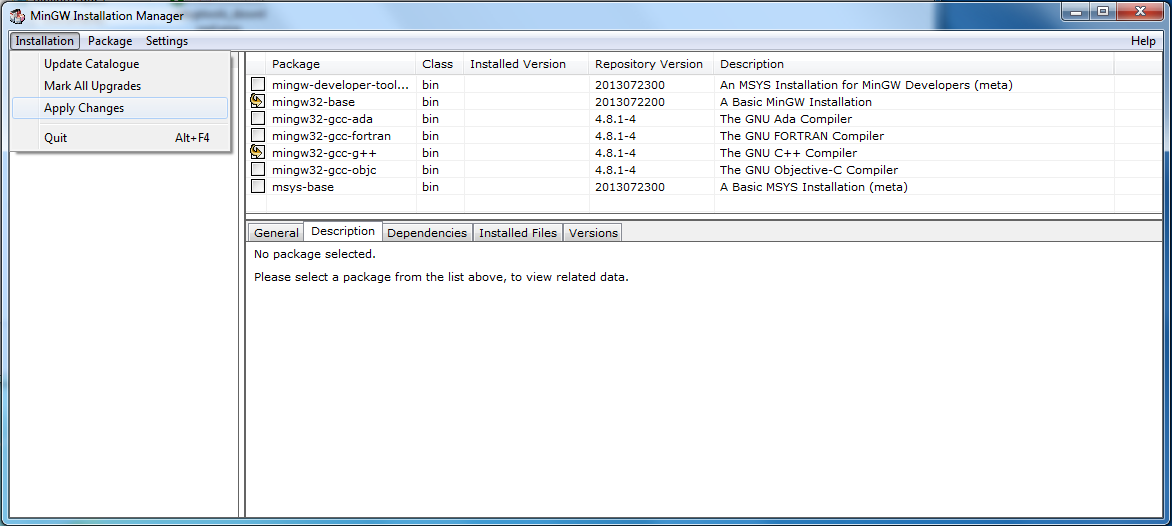
Now go to the “Installation” menu and select “Apply Changes”. On the pop-up windows, press the “Apply” button.
The base version of MinGW along with the G++ compiler will now be automatically installed on your computer (in
C:\MinGWby default, unless you changed the installation directory, which is not recommanded).Quit the MinGW Installation Manager.
MinGW is now installed on your computer, in particular GCC, G++, GDB and mingw32-make.
Setting the user environment variables
There is a last step to complete before being able to use MinGW: adding the installation “bin” folder to the User Path environment variable. Indeed, the installer doesn’t do that automatically.
To do so, following these instructions: (adapted from http://www.mingw.org/wiki/Getting_Started and http://msdn.microsoft.com/en-us/library/dn188695.aspx)
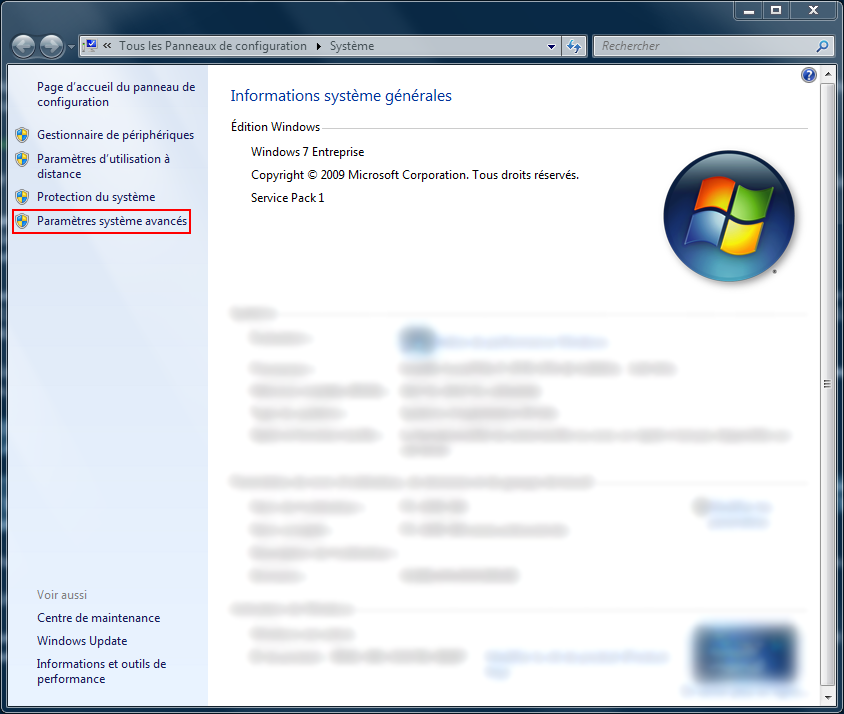
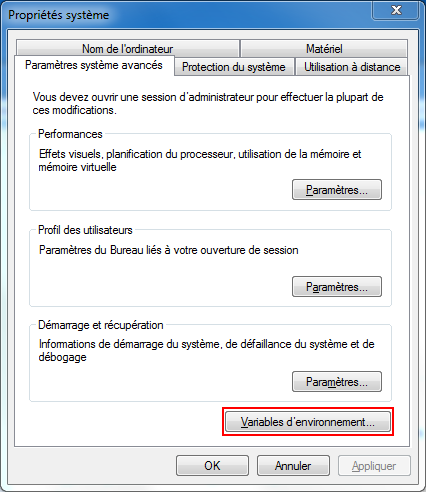
Open the Start Menu. Right-click Computer, then select Properties. Click Advanced system settings and then click Environment Variables.
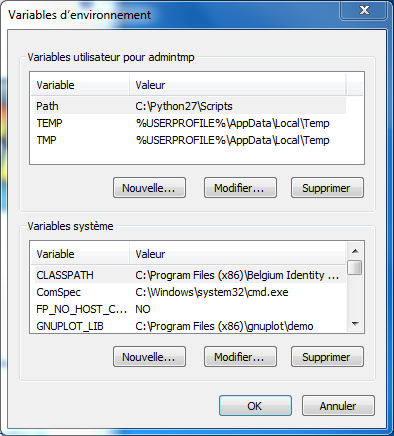
A dialog box now appears, containing two text boxes. The top box shows your user settings, the bottom one the system settings.
Warning
You should not alter the system environment variable in any manner (in the bottom box), or you will cause all sorts of problems for you and your computer!
The Path entry in the top box is the one you want to modify. The next instructions depend on whether or not the User Path environment variable already exists.
If there is no such environment variable in the top box:
- Create it and name it “Path”.
- As value, put
<installation-directory>\bin.
If there is already an environment variable in the top box named “Path”:
- Click on the Path entry , then click on the Edit button.
- Scroll to the end of the string and at the end add
;<installation-directory>\bin(beware of the initial semicolon!).
Note
Substitute <installation-directory> with the FULL absolute path name of the installation target directory you chose (
C:\MinGWby default).Press OK -> OK -> OK and you are done.
To check that the Path environment variable has been correctly modified, open Powershell and issue the following command, which issues the content of both the System and User Path environment variables:
$env:path
or, to have each entry in the Path variable printed in a new line:
($env:path).Replace(';',"`n")
In particular C:\MinGW\bin should be one of those lines by default.
Another way to check the installation is to issue the following command in the command prompt:
mingw32-make -v
It should display the version of mingw32-make.
Creating an alias for mingw32-make in Powershell
If you don’t want to type explicitly mingw32-make each time you want to invoke make, then you can create an alias in your Powershell user profile with this command:
new-alias make mingw32-make
Now, you can simply type make to invoke mingw32-make. For more information about what is a Powershell user profile, go read the Powershell profile note.
Installing Microsoft Visual Studio
What is Microsoft Visual Studio?
Visual Studio is an IDE (Integrated Development Environment) developed by Microsoft. It is used to develop computer programs for Windows. There exists a free flavour of Visual Studio named “Visual Studio Express”, which is the one we’ll use here. More info about Microsoft Visual Studio are available on the dedicated Wikipedia page.
Installation instructions
Before 2012, Microsoft Visual Studio was splitted into several “Express” (i.e. freeware) versions, each one of them geared around a single programming langage: Visual C++ Express, Visual C# Express, Visual Basic Express, etc.
Since 2012, Microsoft Visual Studo “Express” edition is geared toward an overall solution type, and can contain more than one project type. For example, a web solution might consist of a web application project and a couple of C# class-library projects.
The most recent versions of the different “Express” flavours of Microsoft Visual Studio at the date of writing are the following:
- Visual Studio Express 2013 for Web
- Visual Studio Express 2013 for Windows 8.1
- Visual Studio Express 2013 for Windows Desktop
- Visual Studio Team Foundation Server Express 2013
In particular, there might be some confusion between the “Windows 8.1” and the “Windows Desktop” versions. Actually, the Windows 8.1 version allows creating applications for the Windows Store and Windows Phone, hence using the new “Modern UI” interface introduced in Windows 8. The Windows Desktop version, however, enables the creation of “classical” desktop apps in C#, Visual Basic, and C++. This is the one we’ll use here.
What is the difference between Windows SDK, Visual Studio and MSVC ? Microsoft Visual Studio is an IDE, i.e. a graphical environment facilitating the development of applications. Windows SDK is the set of tools used to actually build the software, providing tools, compilers, headers, libraries and code samples. Some Windows SDK components, but not all, are also included natively in Microsoft Visual Studio. Finally, MSVC is simply a shorthand for MicroSoft Visual C++, which was the name of the IDE before 2012. By the way, SDK means Software Development Kit and IDE stands for Integrated Development Environment.
Here, we’ll only use the components of Windows SDK that are shipped with Microsoft Visual Studio and which will be installed automatically.
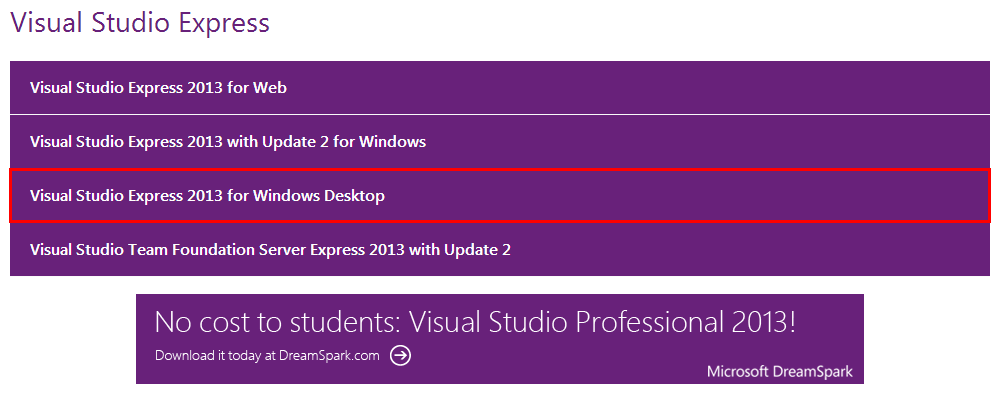
Go to http://www.visualstudio.com/downloads and download “Visual Studio Express 2013 for Windows Desktop”. Make sure not to choose “Visual Studio Express 2013 for Windows”, which does not contain the same tools. You may be asked to login with your Microsoft account in order to download Microsoft Visual Studio. If not already done, create a Microsoft account and login.
Note
If you’re a student, Microsoft offers you to download the complete version of Visual Studio (called “Visual Studio Professional”) for free through its DreamSpark program. More info and links are available on the Visual Studio download page.
Run the program you just downloaded and follow instructions. It will download and install Microsoft Visual Studio, the Windows SDK and the Microsoft .NET framework into your computer. With that software, you will be able to develop 32-bit and 64-bit applications for Windows.
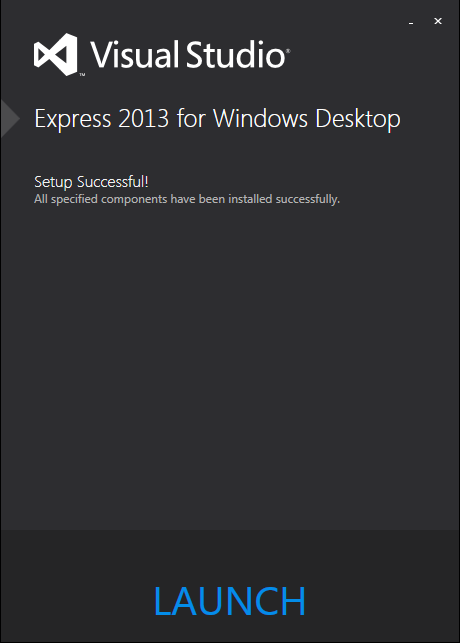
When the installation completes (see picture below), launch Microsoft Visual Studio Express 2013. If you want, you can sign in with your Microsoft account to synchronize your settings across different computers.
Now, it is useful for you to know the version number of your C/C++ compiler and Visual Studio / Visual C++ installation. As explained above, the Microsoft C/C++ compiler is part of the Windows SDK and is natively included within your Visual Studio installation. More precisely, the default path where you’ll find the compiler is C:\Program Files (x86)\Microsoft Visual Studio 12.0\VC\bin. The compiler is cl.exe. There are also other programs, like the linker link.exe or the Microsoft’s implementation of the make tool, nmake.exe.
When installing libraries like the Intel (c) TBB, you will need to know what is the version of your Visual C++ installation in order to correctly link the pre-built libraries. Indeed, such libraries are sometimes built for different versions of the Microsoft C/C++ compiler, each one of them located in a different folder (this is the case for the Intel (c) TBB at least). When you run cl.exe without any options, you will see something like this:
Microsoft (R) C/C++ Optimizing Compiler Version 18.00.21005.1 for x86
which tells you the compiler version number is 18.
However, this is not this version number that will be used in pre-built packages. It is not the release year of your Visual Studio / Visual C++ version either. Actually, what is important to know here is the version number of Visual C++ / Visual Studio. Here you might guess, by looking at the compiler path, that Visual Studio 2013 is version 12, but here is the complete picture (taken from http://en.wikipedia.org/wiki/Visual_C%2B%2B):
- Visual C++ 2005 = Visual C++ 8.0 = vc8 = compiler version 14.
- Visual C++ 2008 = Visual C++ 9.0 = vc9 = compiler version 15.
- Visual C++ 2010 = Visual C++ 10.0 = vc10 = compiler version 16.
- Visual C++ 2012 = Visual C++ 11.0 = vc11 = compiler version 17.
- Visual C++ 2013 = Visual C++ 12.0 = vc12 = compiler version 18.
So, if you installed Microsoft Visual Studio 2013, you’re using Visual C++ 2013, i.e. version 12. So, look at vc12 folder when linking pre-built libraries. Similarly, for Visual Studio 2010, the codename is vc10.