Building OpenCV from sources on Windows 7
Introduction
To use the OpenCV library on Windows, you have two options: either using the pre-built libraries or making your own libraries from the source files. While the first one is easier to complete, it doesn’t take advantage of the most advanced technologies integrated into OpenCV. So, we won’t use the pre-built flavour of OpenCV but instead we’ll build it from the sources. This gives us the opportunity to tune every detail according to our needs and also to take advantage of all the computational power of our computers by using the Intel © Threading Building Blocks (TBB) library.
A quite complete description of the software needed to build OpenCV from sources is available at this page: Software needed to build OpenCV from sources. You don’t have to read it if you are trying to install OpenCV for the first time. In this case, just follow the instructions provided here. However, if you want to get a deeper understanding of what is going on behind the scenes, then it a good starting point. If you want to know more about the different modules of OpenCV before the installation, you can visit the official doc page.
General idea of the workflow and constrains at hand
The title of this tutorial should actually be the following one to be complete: Installation instructions for OpenCV 3.0 on Windows 7 64-bit with Matlab bindings for Matlab R2013a 32-bit and Matlab R2014a 64-bit.
We want to build OpenCV by ourselves to include the Intel TBB library, which allows better using all the cores present on the processor. We also want to use OpenCV with Matlab and for that we will use the bindings provided in the contrib module of OpenCV.
Now, we need a compiler and also to know whether to build the software in 32- or 64-bit. Matlab “helps” us to answer that question. Indeed, the only freely available compiler that can both compile OpenCV and be recognized by Matlab to compile mex files is Visual C++ 2010 Express with Microsoft Windows SDK 7.1. Actually, Visual C++ 2010 Express comes only with the 32-bit compiler of the Windows SDK 7.1, so we need to install Windows SDK 7.1 to add a 64-bit compiler to Visual C++ 2010 Express.
By the way, here is the list of the supported Matlab mex compilers: http://www.mathworks.nl/support/compilers/current_release/. As you can see, the latest versions of Visual Studio are supported but these are paying versions, not freely available to download.
As a supplementary constraint, the 32-bit versions of Matlab only compile mex files in 32-bit and similarly for 64-bit versions. In addition, OpenCV must be built using the exact same compiler as the one used to build the mex bindings for Matlab. Therefore, the target Matlab version imposes how we will compile OpenCV (32- or 64-bit).
In short, we will use Visual C++ 2010 Express and build OpenCV in 32- or 64-bit according to the target Matlab version.
Installation of Visual C++ 2010 Express and Windows SDK 7.1
Windows SDK 7.1
If you have the Microsoft Visual C++ 2010 redistributable packages installed, uninstall them (both x86 and x64) from “Control Panel” > “Programs and Features”.
Download the Windows SDK 7.1 installer here: http://www.microsoft.com/en-us/download/details.aspx?id=8279.
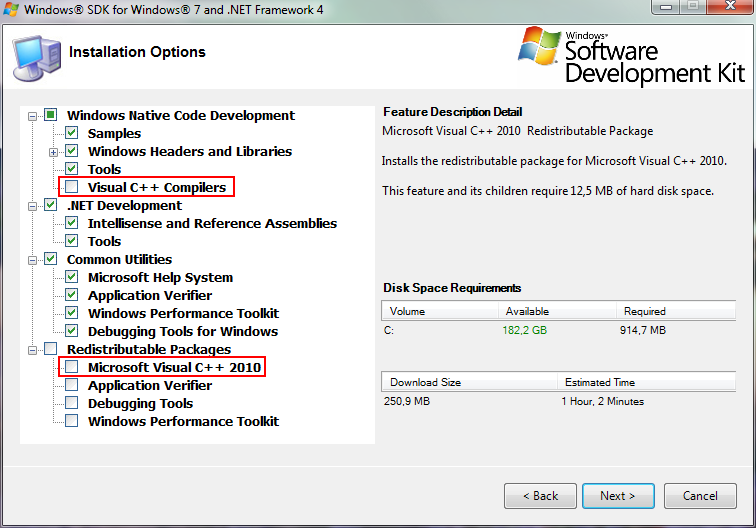
Install the Windows SDK 7.1. During installation, under the “Installation Options” menu, UNCHECK the “Visual C++ Compilers” and “Microsoft Visual C++ 2010” components.
Apply the SDK 7.1 patch from here: http://www.microsoft.com/en-us/download/details.aspx?displaylang=en&id=4422.
Note
The patch installs the version 10.0.30219 of Microsoft Visual C++ 2010 redistributable packages. If you need another version, search for it on the Internet. In particular, here is the link to download installers for the version 10.0.40219 of these packages:
Visual C++ 2010 Express
Download Visual C++ 2010 Express from this page and install it with default options.
ammintrin.h is missing
Problem: After the patch update of the previous section, there are some important header files missing due to packaging error when releasing the patch (aarrgh!). In particular, your compiler might complain that the file ammintrin.h is missing.
Solution: You can download this file here: http://www.mathworks.in/matlabcentral/answers/90383-fix-problem-when-mex-cpp-file. This post also tells you where to put it, i.e. in C:\Program Files (x86)\Microsoft Visual Studio 10.0\VC\include.
Creating Visual C++ 2010 Express 32-bit and 64-bit projects with OpenCV
If you want to create a project with Visual C++ 2010 Express and OpenCV, you can find instructions to setup your project here: http://opencv-srf.blogspot.be/2013/05/installing-configuring-opencv-with-vs.html.
In case you want to build a 64-bit application, here are the complementary instructions to follow: http://stackoverflow.com/questions/1865069/how-to-compile-a-64-bit-application-using-visual-c-2010-express.
Check Matlab recognizes the compiler
In Matlab, issue the following command to check if the compiler (Microsoft Windows SDK 7.1) is correctly recognized by Matlab:
mex -setup
You should get messages like this (these might vary depending on Matlab version; these are collected with Matlab R2014a 64-bit):
MEX configured to use 'Microsoft Windows SDK 7.1 (C)' for C language compilation.
MEX configured to use 'Microsoft Windows SDK 7.1 (C++)' for C++ language compilation.
Building OpenCV from sources with Intel TBB
Create a folder named “OpenCV” at the root of your main disk (I will assume it is
C:\).Install the latest stable version of CMake. Don’t forget to add the executable to the Path environment variable for you or for all users. Here are the detailed instructions: Building tools (CMake, MinGW, Visual Studio).
Download OpenCV 3.0 sources from here: http://opencv.org/downloads.html. OpenCV 3.0 comes as an auto-extractible archive which, once decompressed, provides the sources and a pre-built version of OpenCV. We do not care about the precompiled binaries. You can either trash them or rename the folder “build” into “prebuild”. Alternatively, you can also download the latest version of OpenCV by cloning the official Git repository, as instructed on the page Fetching OpenCV sources from GitHub.
Put the sources in
C:\OpenCV\sources.We also need the Matlab bindings. These are provided as a complementary module to the official OpenCV distribution. Here is a great post explaining how this works: http://imageprocessingblog.com/matlab-bindings-for-opencv/.
- Download all complementary modules source code from here: https://github.com/Itseez/opencv_contrib (download everything for now, we will sort it in the next step).
- Put the files in
C:\OpenCV\contrib. Then remove everything except the Matlab module inC:\OpenCV\contrib\modules\matlab. Alternatively, you can simply put thematlabfolder frommodulesinC:\OpenCV\contrib\modules. - Finally, there is a Python module missing for compiling Matlab bindings. This has been reported as a bug and will likely be corrected in the future. However for now we need to include this file manually. This thread discusses the issue. Follow this link to get the file.
- Put the file (
rst_parser.py) intoC:\OpenCV\contrib\modules\matlab\generator.
Note
There exists an alternative to the official Matlab module of OpenCV to generate Matlab bindings. All information is available at http://kyamagu.github.io/mexopencv/.
Check that you have the required 3rd-party software installed on your computer. Go to the page Installing 3rd-party software for OpenCV on Windows for the instructions.
Create an empty folder named “builds” in
C:\OpenCV.Use CMake to create the Visual Studio project to actually build OpenCV. Here are the instructions: Configuring CMake to build OpenCV on Windows.
Run Visual C++ 2010 Express with Administrator privileges. It will take some time to start, that’s normal because this is a huge project. Open the solution “OpenCV.sln” generated by CMake and located in
C:\OpenCV\builds.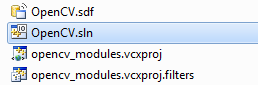
Select Release as build version from top drop-down menu.

Build the following targets in the given order (with right click > Build):
- Release: ALL_BUILD
- Release: INSTALL
Warning
If you are using Avast, shut it down during the compilation as it might interact negatively with the building process and prevent it from completing correctly.
When done (it can take up to 1 hour), close Visual C++ 2010 Express.
Create the environment variables for OpenCV as described here: http://opencv-srf.blogspot.be/2013/05/installing-configuring-opencv-with-vs.html.
Finally, add the Matlab bindings to your Matlab path. This could be done in
startup.mwhich is sourced at startup. The bindings are inC:\OpenCV\builds\install\matlab.To check that OpenCV is correctly installed, you can try to use one of the many “Hello World” project on the Internet with Visual C++ 2010 Express or with Matlab.