Creating a VLAN in Netberg 710 P4 switch

The P4 switch has a “normal switch” mode that is using SONIC and comes with a P4 dataplane compiled and flashed, nothing to compile using Tofino or whatsoever.  This is useful when one of the switch is not used for an experiment and you want to simply wire machines virtually.

Creating a L2 bridge or a VLAN 

By default, the switch boots with all interface in Router mode. They have (random 10.0…) IPs. To use those interface as a switch, you must remove the IPs before adding them to a vlan or you will get the error “Ethernet0 is a router interface” 

$ show ip interfaces 

Interface    Master    IPv4 address/mask    Admin/Oper    BGP Neighbor    Neighbor IP 

———–  ——–  ——————-  ————  ————–  ————- 

… 

Ethernet8              10.0.0.4/31          up/down       ARISTA03T2      10.0.0. 

Ethernet12             10.0.0.6/31          up/down       ARISTA04T2      10.0.0.7 

… 

Remove all IPv4 IPs from the interface with, for instance… 

$ sudo config interface ip remove Ethernet0 10.0.0.0/31 

Then, disable IPv6 link-local addresses with : 

$ sudo config ipv6 disable link-local 

And for each interface : 

$ sudo config interface ipv6 disable use-link-local-only Ethernet0 

Then save the config and reboot as the IPv6 link local will stay 

$ sudo config save –y 

$ sudo reboot 

After a reboot, create the Vlan with : 

$ sudo config vlan add 10 

And add interfaces with : 

$ sudo config vlan member add -u 10 Ethernet0 

Personally, I saved and rebooted again afterward but it might have not be working beforehand due to an interface reset on the machines.

A collection of Network Systems icons in SVG

You can use mine as you wish, I tried to find the original authors and the appropriate license whenever I could. Don’t hesitate to send me your own.

NAND SSD (inspired from https://commons.wikimedia.org/wiki/File:NAND-ssd.svg, CC )
RAM Module ( inspired from https://fr.m.wikibooks.org/wiki/Fichier:Ram-module.svg CC)
CPU (absed on https://commons.wikimedia.org/wiki/File:Abstract_i7_CPU_icon.svg, CC)
DPI (unsure but I think it’s my own. Anyway it’s standard)
Fast (own)

GPU (own)
IPSEC (unsure)
Load Balancer (unsure)
Monitoring, monitor, measurements (unsure)

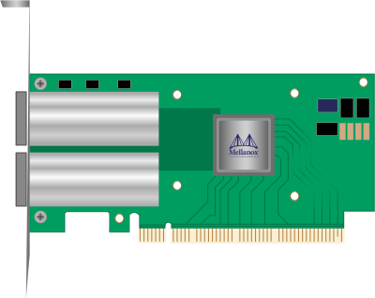
Mellanox NIC (not SVG, Mellanox)
100G NIC (inspired from the above, consider my own I guess)

Router (unsure, but this is quite sandard…)
VLAN (own)

Retina: Analyzing 100 GbE Traffic on Commodity Hardware

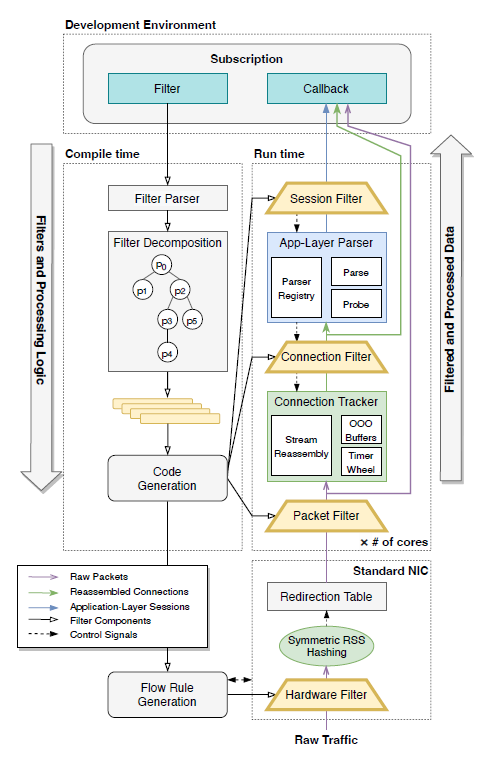
I’m pleased to announce Retina has been accepted to appear at SIGCOMM at the end of the month ! It is the result of a pleasant collaboration with Gerry Wan, Fengchen Gong and Zakir Durumeric from Stanford.

Retina enables high-speed network forensics by building a binary tailored to a specific experiment written in Rust. It provides convenient filtering capabilities to easily answer questions such as “Is the TLS SNI really random?” or “How many TLS handshake are destined to Netflix?”. Tested at up to 160Gbps with a commodity server on a Stanford traffic TAP, it supports 5-100x higher traffic rates than standard “bloatware” IDSes.

paper ; github ; the video will follow after SIGCOMM

MPTCP on Windows with WSL2

Limitations

It is possible to use MPTCP, but WSL2 uses a virtual interface that prevents advertising multiple paths. There might be a solution using multiple forwarded ports but I haven’t been able to use it yet.

Prerequisite

Install Ubuntu in WSL2 (simply look for Ubuntu in the Microsoft Store)

Optional: Allow Windows to keep both Wifi and Ethernet open

Windows will automatically turn off wifi when Ethernet is plugged in. If you want to try MPTCP over Wifi + Ethernet (or 4G through USB, all the same) you must disable this behavior :

1. Open Registry Editor.

2. Go to HKEY_LOCAL_MACHINE\Software\Policies\Microsoft\Windows\WcmSvc\Local.

3. Create/change the fMinimizeConnections registry DWORD to 0.

4. Close Registry Editor and reboot.

Step 1 : Install an MPTCP-compatible Kernel (easier than it sounds!)

sudo apt install build-essential flex bison libssl-dev libelf-dev pahole
git clone https://github.com/microsoft/WSL2-Linux-Kernel.git
cd WSL2-Linux-Kernel
cp Microsoft/config-wsl .config

Edit .config and change “#CONFIG_MPTCP is not set” by CONFIG_MPTCP=y

make -j4
cp arch/x86/boot/vmlinux.bin /mnt/c/vmlinux

Then shut down WSL in a CMD window:

wsl --shutdown

And to boot in your new kernel add a file in C:\Users\$USER\.wslconfig

[wsl2]
kernel=C:\vmlinux

Step 2 : Install mptcpd

This is to get the “mptcpize” command to run a legacy TCP application with mptcp

sudo apt install mptcpd

Step 3 : Try it out !

sudo apt install iperf
sudo tcpdump -i  lo -w capture.pcap
mptcpize run iperf -s
mptcpize run iperf -c 127.0.0.1 -b 1k -l 1

Then open capture.pcap with wireshark and you should see MPTCP instead of TCP 🙂

Step 3 : SSH and failover

[todo!]

VOO in bridge mode with IPv6 (optional: and prefix delegation!)

Despite old threads that can be seen on VOO’s forum, VOO do not seem to use SLAAC in bridge mode (anymore?), but DHCPv6. Also VOO only gives a /64 prefix so you can’t do internal subnets 🙁

Important: my outgoing (WAN) interface directly connected to the VOO modem in bridge mode is enx000ec6ec03b3 . My internal LAN interface is br0 (it’s a bridge between my actual eth0 LAN interface and a WiFi access point using hostapd, but that’s for another day).

This tutorial assumes Ubuntu 18.04:

sudo apt install wide-dhcpv6-client

sudo vi /etc/wide-dhcpv6/dhcp6c.conf

interface enx000ec6ec03b3 {
  send ia-na 1;
  send ia-pd 1;
  request domain-name-servers;
  request domain-name;
  script "/etc/wide-dhcpv6/dhcp6c-script";
};

# Only for prefix delegation
id-assoc pd 1 {
  prefix-interface br0 { #internal facing interface (LAN)
    sla-id 0; # subnet. Combined with ia-pd to configure the subnet for this interface.
    ifid 1; #IP address "postfix". if not set it will use EUI-64 address of the interface. Combined with SLA-ID'd prefix to create full IP address of interface.
    sla-len 0; # Number of prefix bits assigned. Sadly this is 0 with voo... 
    };
  };

  id-assoc na 1 {
  # id-assoc for eth1
};

sudo vi /etc/default/wide-dhcpv6-client

INTERFACES="enx000ec6ec03b3"

sudo service wide-dhcpv6-client restart

At this point you should get an IPv6 address:

enx000ec6ec03b3: flags=4163<UP,BROADCAST,RUNNING,MULTICAST>  mtu 1500
        inet 109.89.XXX  netmask 255.255.255.0  broadcast 109.89.XXXX
        inet6 2a02:2788:XXXXXXXXX:8458  prefixlen 128  scopeid 0x0<global>
        inet6 fe80::20e:c6ff:feec:3b3  prefixlen 64  scopeid 0x20<link>
        ether 00:0e:c6:ec:03:b3  txqueuelen 1000  (Ethernet)
        RX packets 1358557038  bytes 1701875645905 (1.7 TB)
        RX errors 0  dropped 0  overruns 0  frame 0
        TX packets 648168501  bytes 176987273193 (176.9 GB)
        TX errors 0  dropped 0 overruns 0  carrier 0  collisions 0

Enable prefix delegation

Actually enable the prefix delegation with radvd:

sudo apt-get install radvd

sudo vi /etc/radvd.conf

interface br0 # LAN interface
{
  AdvManagedFlag off; # no DHCPv6 server here.
  AdvOtherConfigFlag off; # not even for options.
  AdvSendAdvert on;
  AdvDefaultPreference high;
  AdvLinkMTU 1280;
  prefix ::/64 #pick one non-link-local prefix assigned to the interface and start advertising it
  {
    AdvOnLink on;
    AdvAutonomous on;
  };
};

sudo service radvd restart

Some configuration is taken and adapted from https://www.ipcalypse.ca/?p=204

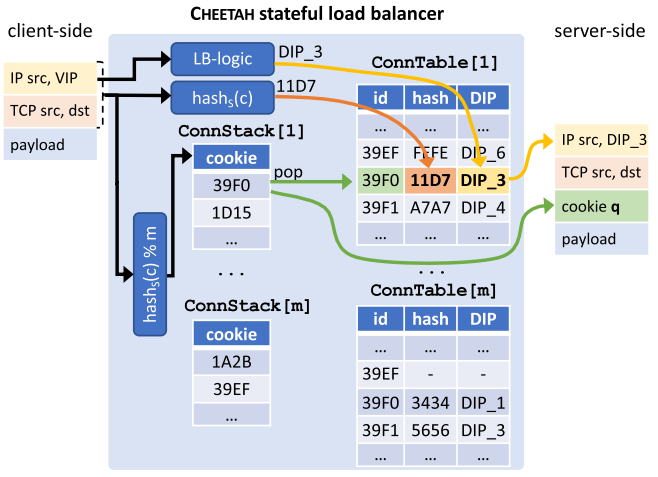
The extended version of Cheetah: “A High-Speed Programmable Load-Balancer Framework With Guaranteed Per-Connection-Consistency” has been published in ACM/IEEE ToN

In this journal version, we extended our conference paper with additional, peer-reviewed material:

  • We implemented our system on QUIC using P4 and Picoquic. This demonstrates that our approach does not depend solely on TCP timestamps. The code in ‘bmv2’ and ‘p4-tofino’ has been made publicly available.  All of our code is available at https://github.com/cheetahlb/
  • We added an experiment using the Tofino implementation and the QUIC implementation of Cheetah for an HTTP webserver.
  • We added an experiment to verify whether today’s OSes support TCP timestamp, have them enabled by default, and correctly echo the TCP timestamp set by a server.
  • We added an experiment to verify the granularity of the TCP timestamp units used by some of the largest Alexa top 100 websites. 
  • We added a proof sketch on the size of the cookies given a number of servers. 
  • We added an implementation in bmv2 of the “TCP timestamp”-based system. We have also rewritten and published the P4- tofino code of the system. The implementation of the stateful LB is non-trivial as it requires the insertions/lookups/deletions operations to be applied in constant time (and more restrictions apply). We describe our implementation of a stack-based data structure for the Tofino in Section 4.3. 
  • We added a micro-benchmark of the performance of the Cheetah LB, e.g., compared SYN insertions with cuckoo, normal packets, 
  • We broke down the benefits of SSE parsing of TCP options instructions.
  • We evaluated the packet processing latency overheads of realizing Cheetah on a Tofino for both the TCP timestamp and QUIC implementation.
  • We clarified the design challenges in the introduction.

Check out the paper in open access !

Our new Journal extension of Metron “High Performance NFV Service Chaining Even in the Presence of Blackboxes”

Georgios P. Katsika, Tom Barbette, Dejan Kostić, JR. Gerald Q. Maguire, Rebecca Steinert

The NSDI version of Metron supported the integration of blackbox network functions (NFs) using ring buffers. This choice limited Metron’s applicability, as real networks might contain hardware blackboxes (also known as middleboxes) or closed-source blackbox binaries running inside virtual machines (VMs) or containers. In this extended journal version published in ACM Transaction on Computer Systems, we put special effort on integrating these important blackbox types into Metron, while maintaining Metron’s hardware-level performance.

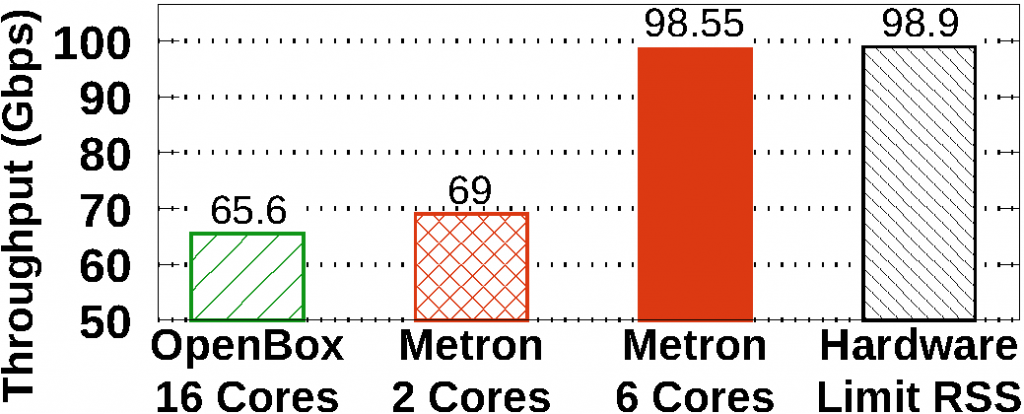
Metron achieves 100G for a chain of VNF, up to 8* better efficiency than SoTA. Check the paper for more details.

This integration was not trivial as it involved tedious low-level system aspects related to (i) efficiently dispatching packets without introducing unnecessary inter-core communication and (ii) techniques to allow high-speed service chaining. These were key principles of Metron that we wanted to maintain. Moreover, we incorporated the latest functionalities of modern 100 GbE NICs, such as single root I/O virtualization (SR-IOV) that enables physical to virtual NIC dispatching, avoiding the need for software switching. Metron instructs the physical NIC to tag the packets according to the core associated with a traffic class by the controller. The tag can then be used to dispatch packets to queues just as a Metron agent does.

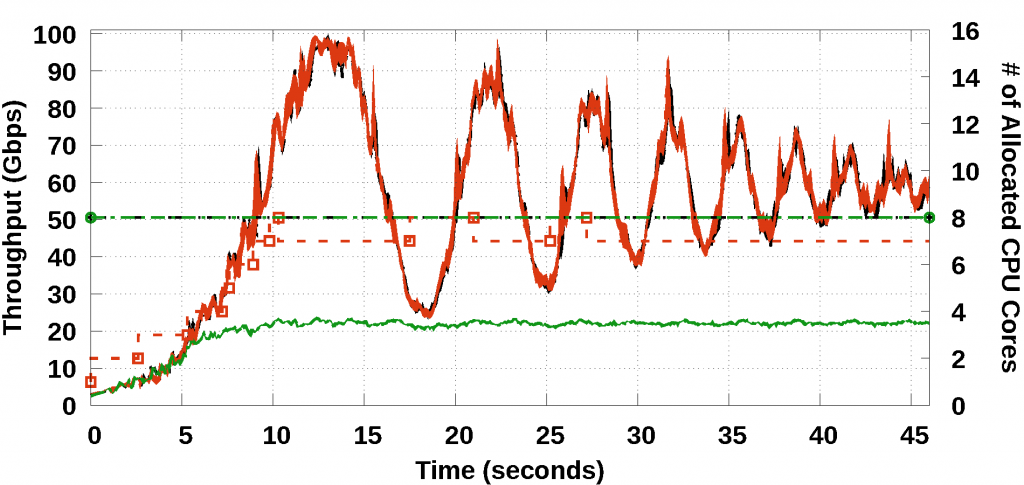
As appeared in USENIX NSDI 2018, the original Metron system demonstrated an experiment on dynamic scaling at 10 Gbps. 100 GbE deployments are becoming the new commodity. Therefore, we put substantial effort on refining Metron’s scaling algorithm. Part of this algorithm uses our new method for deriving the load of a CPU core even when this core performs NIC polling (e.g., using DPDK poll mode drivers).

Metron rapidly reacts to change in the input load, see Fig 16 for more details

The 100 GbE testbed used in the NSDI version of Metron exhibited hardware limitations that prevented Metron from reaching line-rate performance. In this journal, we repeated the same experiment on two additional testbeds: First we upgraded the 100 GbE NICs of the original testbed (i.e., replacing the Mellanox ConnectX-4 with newer Mellanox ConnectX-5 NICs) and managed to increase the maximum throughput at 85 Gbps (76 Gbps was the previous limit). Then, we also upgraded the servers of the testbed using new workstations with Intel’s Skylake hardware architecture (the old servers used Intel’s Haswell hardware architecture) and managed to achieve line-rate 100 Gbps packet processing.

The paper also presents a dozen other novelties compared to the NSDI version, so check it out!

Paper (open access)

FOSDEM’21: FastClick and beyond…

Early February we presented a talk at FOSDEM, a huge Open-Source gathering with my colleague Alireza Farshin. The video is now released!

In the talk we present FastClick with a short demo, do a round of existing alternative modular framework (VPP and BESS mainly) and then discuss the future of software dataplanes, which we believe our recent work PacketMill starts to address.

We mainly show how FastClick is still really up-to-date with competition and goes beyond sota with PacketMill’s enhancements. We also re-did an experiment at 100G showing how FastClick now improves Click by more than 30x in a forwarding configuration. This is because we continued to maintain FastClick since nearly 6 years now and we do consider pull requests, and integrate recent research while good old Click itself is sadly stalling since a decade now. I will do a blog post about the state of FastClick in the next weeks.

I also bought the www.fastclick.dev domain to start a little showcase website. For now it redirects to GitHub. Feel free to help 🙂

Links : video ; slides ; page

A poster of our latest work, CrossRSS, a Stateless CPU-Aware Datacenter Load-Balancer

Today we will present a poster of our latest work, at CoNEXT’20 : CrossRSS! CrossRSS is a load-balancer that spreads the load uniformly even inside the servers. It uses knowledge of the dispatching done inside the servers, RSS, to purposely select less-loaded cores without any server modification, or inter-core communications on the server. Learn more by watching the short video!

The poster session will be held on the 4th of December, 2:30 CET on the Mozilla VR Hub

Extended Abstract ; Hub ; Video ; Poster-As-Slides