Proximus BBOX 3 in bridge mode with prefix delegation on Linux

Using bridge mode allows you to get a public IP address on one computer (which can serve as a router) behind your modem. This allows you to know your public IP address without using a third-party service, and control more finely all your routing parameters inside your own Linux-based router (this tutorial) or a better router than the BBOX’s one.

We’ll call “the router” the device you want to use behind the modem for clarity.

The bridge mode of the Proximus BBOX 3 is quite interesting. You connect normally to your BBOX using DHCP and will get a locally routable address (i.e. 192.168.0.0/24), but you can use PPP over Ethernet (PPPoE) to get a virtual interface inside your router. This virtual “ppp” interface will have a public IP address, and packets will flow IN and OUT the internet through that interface.

Proximus allows you to therefore maintain 2 PPP connections, one established by the BBOX (also used for the TV), and the other inside your router. It also means your home gets 2 IPv4 addresses.

I prefer that mode to the VOO one, where the external IP address is given by DHCP to only one host in the LAN, the first device to connect to the router using DHCP (dangerous and prone to configuration errors...). Same and independently for IPv6 using DHCPv6. While Proximus not only gives you an IPv6 address but also a /64 prefix via PPPoE to get a direct connection without using a crappy NAT to all your PCs. For IPv6, Proximus is much simpler than setting up an independent DHCPv6 client which gives back the v6 prefix to your LAN side. The second downside is that VOO must use ugly hacks to allow connection to the box as there is no "modem internal network" anymore. You can access your modem at the normally-illegal 192.168.100.1 address as this is on the "public web" space from the router perspective. Moreover, it seems that the modem stops responding to DHCP requests from time to time, losing connectivity... VOO bridge mode is definitively not good... But this may be a temporary bug. I did not observe this anymore...

The bridge/WAN part

Edit /etc/network/interfaces to add the following lines , assuming that eth0 is the interface used to connect to your BBOX.

auto dsl-provider
 iface dsl-provider inet ppp
 pre-up /bin/ip link set eth0 up
 provider dsl-provider

Install pppoe with sudo apt-get install pppoe on ubuntu/debian or sudo yum install pppoe centos/fedora

Then create a file named /etc/ppp/peers/dsl-provider and add the following lines :

noipdefault
defaultroute
replacedefaultroute
hide-password
noauth
persist
mtu 1492
plugin rp-pppoe.so eth0
user "fc0123456@skynet"
usepeerdns

Then edit the file /etc/ppp/chap-secrets and add the line :
"fc012345@skynet" * "password"

If you lost your skynet credentials (personally, I just never received them), you can change them online on MyProximus. You’ll have to reboot your modem so it receives automatically the new credentials.

And that’s all, you can reboot or do a sudo pon dsl-provider and you’ll have a new interface with a public IPv4 and a /64 IPv6.

The router/LAN part

To give connectivity in IPv4 for your hosts and use your Linux host as a router, you’ll have to do a NAT. But you can delegate your IPv6 range and give public IPv6 addresses to all your PCs using SLAAC! Remember to also install a firewall…

To do so, install radvd and add in /etc/radvd.conf (if br0 is the interface connected to your internal network) :

interface br0

{
 AdvSendAdvert on;
 prefix ::/64
 {
   AdvOnLink on;
   AdvAutonomous on;
   AdvRouterAddr on;
 };
 RDNSS 2001:4860:4860::8888 2001:4860:4860::8844
 {
   # AdvRDNSSLifetime 3600;
 };
};

Then do a sudo radvd restart and that’s it.

The RDNSS line gives the address of Google’s public DNS to your host. We could use Proximus’ one, but I don’t have the address on hand.

Do not hesitate to contact me!
Creating a dynamic and redundant array with LVM and MDADM

RAID5 allows to create an array of N+1 drives where N is the number of drives which will contain real data. The last drive will be used to store parity about the other drives (in practice, the parity information is stored by chunks across all drives and not only on one drive). RAID 5 allows to loose any of the drive without loosing the data thanks to the parity drive, and has a cheaper cost than RAID 1 where the usable data will be N/ instead of N-1.

MDADM is the tool of predilection to build a RAID5 drive. Given 3 disks, the command to build a raid 5 array is :

[code lang=”bash”]mdadm –create /dev/md0 –level=5 –raid-devices=3 /dev/sda1 /dev/sdb1 /dev/sdc1[/code]

Problem is, RAID5 drives are not easily splittable/shrinkable/resizable, the operation is complex and must be done offline. The solution is to use LVM on top of MDADM to build a big volume group which will be “protected” by RAID5 allowing to make dynamic paritions on it :

[code lang=”bash”]pvcreate /dev/md0
vgcreate group0 /dev/md0[/code]

And then create multiple, online-resizeable partitions with :

[code lang=”bash”]lvcreate /dev/group0 -n system -L 10G
mkfs.ext4 /dev/mapper/group0-system[/code]

[code lang=”bash”]lvcreate /dev/group0 -n home -L 50G
mkfs.ext4 /dev/mapper/group0-home[/code]

To resize a partition, one can do :

[code lang=”bash”]lvresize /dev/mapper/group0-home -L +10G
resize2fs /dev/mapper/group0-home[/code]

Which will add 10G to the partition, and resize it. It will work even with the system partition, without needing any reboot.


Enable Wifi N access point with hostapd

I use an odroid (a rasberry-pi like mini-pc but more powerfull) as a Wifi access point for my smartphone and my camera since quite a long time. I forgot that my USB Wifi dongle was compatible with Wifi N (only on 2.4Ghz), so my hostapd config file was :

[code]interface=wlan3
ssid=Barbette-Chambre
hw_mode=g
channel=11
bridge=br0
wpa=2
wpa_passphrase=YOURPASSPHRASE
wpa_key_mgmt=WPA-PSK
wpa_pairwise=CCMP
rsn_pairwise=CCMP
wpa_ptk_rekey=600[/code]

Here is the speed result with iperf :

[ 4] local 10.0.0.44 port 5001 connected with 10.0.0.175 port 48727
[ ID] Interval Transfer Bandwidth
[ 4] 0.0-10.2 sec 18.4 MBytes 15.1 Mbits/sec

Normaly, this should be 56Mbits/s, but we know wifi is crap…

And to enable Wifi N :

[code]

interface=wlan3
ssid=Barbette-Chambre
hw_mode=g   #Yes, this is not an error. Wifi N builds on top of G 😉
channel=11
bridge=br0
ieee80211n=1
wmm_enabled=1
country_code=BE
ht_capab=[HT20][HT40][SHORT-GI-20][SHORT-GI-40]
ieee80211d=1
wpa=2
wpa_passphrase=YOURPASSPHRASE
wpa_key_mgmt=WPA-PSK
wpa_pairwise=CCMP
rsn_pairwise=CCMP
wpa_ptk_rekey=600[/code]


And the speed result is now :

[ 4] local 10.0.0.44 port 5001 connected with 10.0.0.175 port 48754
[ 4] 0.0-10.1 sec 30.6 MBytes 25.4 Mbits/sec

Better, but still not the 150Mbits/s of wifi N… But it’s better !

Limit rate of mail sent by motion detection daemon (motiond) for webcam surveillance

Maybe you use the “on_picture_save” to send yourself an e-mail with motiond when your webcam detect an  intruder. But when someone enters, you’ll receive a lot of pictures. And if it was just you forgetting to stop the detection before entering, your smartphone will become a christmas tree for nothing…

I just published my last program “limitrate” on Github :

https://github.com/tbarbette/limitrate

This programs allows you to limit the rate of launching a certain command. Instead of launching

/usr/bin/program argument1 argument2

call :

limitrate 30 “/usr/bin/program % argument2” argument1

To launch only this command at maximum once every 30 seconds. If you call multiple times the last line in 30 seconds, limitrate will run the command only after 30 seconds replacing the “%” by the concatenation of all “argument 1”. For example to send an alert e-mail containing files (for example webcam picture) at max every 30 seconds :

10:24:30 : limitrate 30 "echo \"Alert!\" | mailx % destination@mail.com" "-A /path/to/file1"
--> Send a mail with file1
10:24:32 : limitrate 30 "echo \"Alert!\" | mailx % destination@mail.com" "-A /path/to/file2"
10:24:38 : limitrate 30 "echo \"Alert!\" | mailx % destination@mail.com" "-A /path/to/file3"
10:24:41 : limitrate 30 "echo \"Alert!\" | mailx % destination@mail.com" "-A /path/to/file4"
10:25:05 : limitrate 30 "echo \"Alert!\" | mailx % destination@mail.com" "-A /path/to/file5"
--> Send a mail with file 2,3,4 and 5

Example configuration for motion detection daemon (Camera surveillance) :

on_picture_save /usr/local/bin/limitrate 15 “echo \”See attachment below.\” | mailx -s ‘Motion in the saloon !’ %destination@tombarbette.be” “-A %f”

When an intrusion is detected, you’ll receive a first e-mail with one image. 15 seconds later you’ll receive all the new images in only one mail, and so on.

ZSH : Open terminal where you left, for each session

There is some snippets for ZSH configuration which allow you to re-open the session in the folder where it was last closed available on the web. The problem is that you often launch 3 sessions at the same time, work on them and then quit/reboot/loose SSH connections/… So you will re-log 3 sessions which will start in the same last opened folder.

I propose a version allowing to keep the last folder per-session. Each ZSH session receive a number and write the current folder in a per-session file. When you open a new session it opens the file number associated to the session number.


Add somewhere in .zshrc :

[code]mkdir -p ~/.cwd/
session_num=`pgrep zsh | wc -l`
function cd() {
builtin cd “$@”;
echo “$PWD” > ~/.cwd/$session_num
echo “$PWD” > ~/.cwd/last
}
export cd
function cwd() {
if [ -e ~/.cwd/$session_num ] ; then
cd “$(cat ~/.cwd/$session_num)”
else
cd “$(cat ~/.cwd/last)”
fi
echo “This is session #$session_num”
}[/code]

And at the bottom of the file :

[code]cwd[/code]


Installing Spotify 9.10 (may 20), 9.11 (july 2) on fedora 20 64 bits

UPDATE : Tested for 9.11 on July 2


Remove any old version of spotify :

yum remove “*spotify*”

rm -rf /usr/local/share/spotify*


Remove any configuration file of the last spotify version :

rm -rf /home/$USER/.config/spotify

rm -rf /home/$USER/.cache/spotify


Download the debian package at http://repository.spotify.com/pool/non-free/s/spotify/spotify-client_0.9.10.17.g4129e1c.78-1_amd64.deb  http://repository.spotify.com/pool/non-free/s/spotify/spotify-client_0.9.11.26.g995ec04.78-1_amd64.deb:

wget http://repository.spotify.com/pool/non-free/s/spotify/spotify-client_0.9.11.26.g995ec04.78-1_amd64.deb


Install alien to convert the deb to RPM :

sudo yum install alien


Convert the deb to RPM with alien :

fakeroot alien -r spotify-client_0.9.10.17.g4129e1c.78-1_amd64.deb


Install the rpm :

sudo rpm -ivh –nodeps –force spotify-client-0.9.10.17.g4129e1c.78-2.x86_64.rpm


You will very probably have problems of dependencies to old libraries when launching spotify, like for libssl.so.1.0.0 , libudev.so.0 and libcrypto.so.1.0.0, I made a tarball with them.


Download oldlibs.tar :

wget https://www.tombarbette.be/wp-content/uploads/2014/05/oldlibs.tar.gz


Untar them :

tar -zxvf oldlibs.tar.gz


Copy them to /usr/lib64 :

cp -rf oldlibs/* /usr/lib64/


Remove the tarball :

rm -rf oldlibs*


If you don’t have any shorcut to launch spotify, copy the desktop entry :

cp -rf /opt/spotify/spotify-client/spotify.desktop /usr/share/applications/


If when you type “spotify” it doesn’t launch anything (and say this command is not found) :

sudo ln -s /opt/spotify/spotify-client/spotify /usr/bin/spotify

HTop

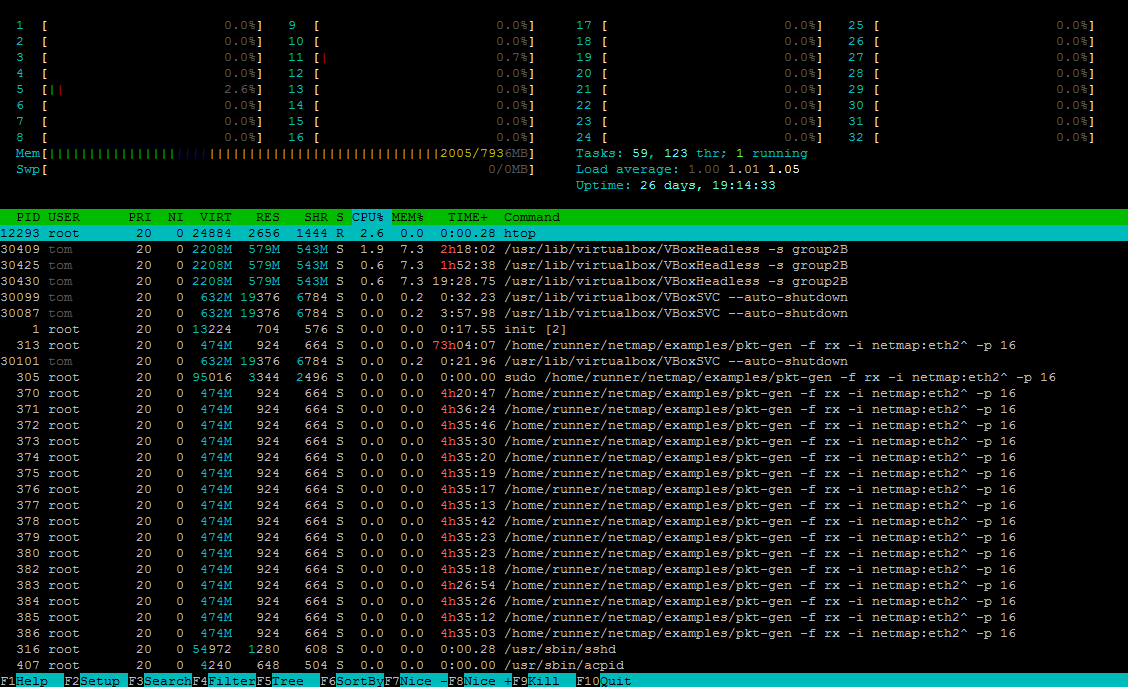
Maybe you already know the program “top”, “htop” is its enhanced version. And is very usefull to see how your systems handle its load and where is the load.


htop


You’ve got your CPUs load per core on top. Here I’ve got two processors with 8 cores each, and having hyperthreading activated, so 32 logical cores. The part in green is the percentage of time spent in your programs, and the read is the percentage of time spent in kernel. You also have the memory usage and programs.


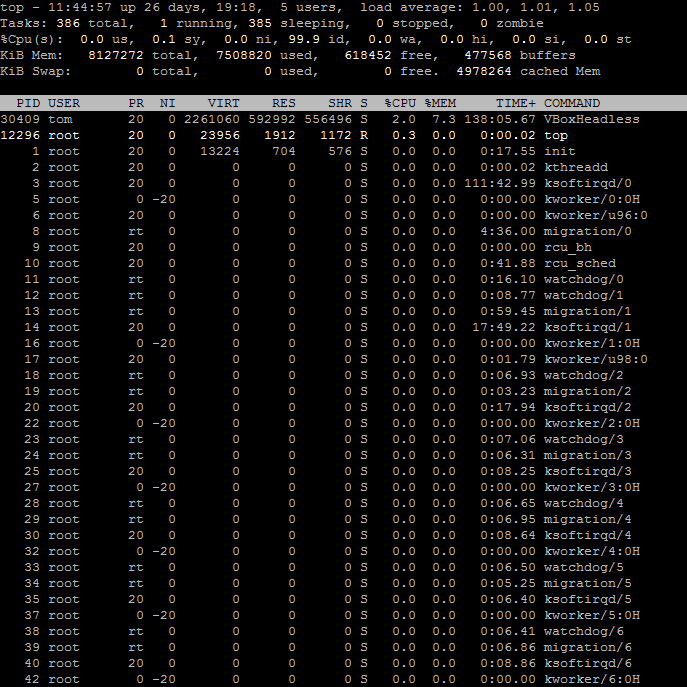
top

Top – Remember…

Post it – What to save when reinstalling a server

More a post-it for myself, what to save when formatting or doing a major upgrade of my linux servers.


– database SQL – Saving /var/lib/mysql is possible but you’ll have to change some maintenance passwords. The easiest is to export your databases with the export function of phpmyadmin or with mysqldump.
– /var/svn – If you have an SVN server
– /var/www – Websites
– /etc – Configuration. Do not re-apply everything ! Choose only some config files for example :

  • /etc/dhcp/dhcpd.conf – Dhcp server config file
  • /etc/php/php.ini (can change according to linux distributions) – Php configuration
  • /etc/apache/sites-enbabled – Apache websites
  • /etc/apache/apache2.conf – Apache config
  • /etc/passwd /etc/shadow /etc/group – Users, groups, and passwords. But I may be a good idea to force everyone to change passwords at the same time, and to clean…
  • And many many mores…

– /home – If you want to keep user data. You should not have to save that when re-formatting your system because /home should always be another partition than the system “/” partition.
– ~/public_html – If not saving the homes, saves your local websites…


Any other ideas?

Understanding sleeping mechanism in Linux Kernel

The students of INFO-0940 were asked to remove a task from it’s current scheduler class when calling a new syscall and put it back when we call again that syscall. The question is : what to do if the task is currently sleeping? Cause the timer will expire at one moment and maybe put back the state to TASK_RUNNING and run the task which should haven’t been able to run again. So either it expires after the processus is back in its previous scheduler, and that’s okay as it will reset it in a runnable state. Or it expires while it’s still removed, and that’s a problem as it will put it back in its previous state (or not, depending on how the syscall is implemented).
Warning : this post is just the result of a quick look. More to give you some ideas and basis for understanding the sleeping mechanism.


So we should try to understand how sleep works.


Let’s look at the nanosleep syscall (which is called when you user sleep() or usleep() functions in C).

SYSCALL_DEFINE2(nanosleep, struct timespec __user *, rqtp,
		struct timespec __user *, rmtp)
{
	struct timespec tu;

	if (copy_from_user(&tu, rqtp, sizeof(tu)))
		return -EFAULT;

	if (!timespec_valid(&tu))
		return -EINVAL;

	return hrtimer_nanosleep(&tu, rmtp, HRTIMER_MODE_REL, CLOCK_MONOTONIC);
}

It copies the userspace data, check that the time is valid and call hrtimer_nanosleep.

long hrtimer_nanosleep(struct timespec *rqtp, struct timespec __user *rmtp,
		       const enum hrtimer_mode mode, const clockid_t clockid)
{
	struct restart_block *restart;
	struct hrtimer_sleeper t;
	int ret = 0;
	unsigned long slack;

	slack = current->timer_slack_ns;
	if (rt_task(current))
		slack = 0;

	hrtimer_init_on_stack(&t.timer, clockid, mode);
	hrtimer_set_expires_range_ns(&t.timer, timespec_to_ktime(*rqtp), slack);
	if (do_nanosleep(&t, mode))
		goto out;

	/* Absolute timers do not update the rmtp value and restart: */
	if (mode == HRTIMER_MODE_ABS) {
		ret = -ERESTARTNOHAND;
		goto out;
	}

	if (rmtp) {
		ret = update_rmtp(&t.timer, rmtp);
		if (ret <= 0)
			goto out;
	}

	restart = &current_thread_info()->restart_block;
	restart->fn = hrtimer_nanosleep_restart;
	restart->nanosleep.clockid = t.timer.base->clockid;
	restart->nanosleep.rmtp = rmtp;
	restart->nanosleep.expires = hrtimer_get_expires_tv64(&t.timer);

	ret = -ERESTART_RESTARTBLOCK;
out:
	destroy_hrtimer_on_stack(&t.timer);
	return ret;
}

It initialize a timer and call do_nanosleep giving it the timer. After do_nanosleep it will destroy/free the timer structure.

static int __sched do_nanosleep(struct hrtimer_sleeper *t, enum hrtimer_mode mode)
{
	hrtimer_init_sleeper(t, current);

	do {
		set_current_state(TASK_INTERRUPTIBLE);
		hrtimer_start_expires(&t->timer, mode);
		if (!hrtimer_active(&t->timer))
			t->task = NULL;

		if (likely(t->task))
			schedule();

		hrtimer_cancel(&t->timer);
		mode = HRTIMER_MODE_ABS;

	} while (t->task && !signal_pending(current));

	__set_current_state(TASK_RUNNING);

	return t->task == NULL;
}

This is the interesting part.


The first thing done is calling hrtimer_init_sleeper(); which will set parameters of the timer to call the function hrtimer_wakeup when the timer expires, and specify the task to wakeup at that time. hrtimer_wakeup will simply set the task to NULL and call wake_up_process() on that task. We’ll come back to wake_up_process(task) later.


We see that after that the state is changed to TASK_INTERRUPTIBLE. Then it starts the timer strictly speaking, and go in schedule().


Remember that schedule(), before scheduling a new task, will test the state of the current (which is now “previous”) task, and if the state is not TASK_RUNNING, it will remove that task from its runqueue (and that is the case as it is in the TASK_INTERRUPTIBLE state).


Schedule() goes on and start scheduling another task, if there is not, it will run the “idle” task.


At some point, the timer will expire. The timer rely on an hardware timer which will cause an interrupt, leaving any current task to process the interrupt handler (this is not the schedule() handler and so on !). The interrupt handler for the hardware timer is  hrtimer_interrupt() which will run hrtimer_wakeup() for all expired timer. As said before, outr timer for the sleeping mechanism will set the timer task as NULL, and call wake_up_process(). But that functions just put back the process in the runqueue and set its state to TASK_RUNNING, not actually scheduling it. The interrupt handler will finish and the CPU will go back to it’s currently running process (maybe the idle process, running the cpu_idle() function). 


That currently running process will eventually finish its processing or be preempted (the normal scheduling mechanism), and the process which was sleeping will re-run again when it will be picked again by pick_next_task().


But where will this process restart? After the sleep() or usleep() call? No ! Where it was… in the nanosleep syscall. What does the syscall do after its call to schedule()? Put the state back to TASK_RUNNING and effectively running. That seems obvious as we said before that the syscall is taking care of destroying the timer structure, so it should not restart after the syscall.


Note that I skipped the part where do_nanosleep() is looping and so on… I tried usleep(1) and sleep(1), and the loop never happend. I suspect it’s for very long timers, the kernel would’nt launch a timer of 1 hour long… But it’s just a guess.


Home server : auto-shutdown if no other computers are running

I wanted to shutdown my linux home media server if there is no running computer on my network. So I wrote this little programs which reads all known ips from DHCP configuration and lease files and send a ping to them. If the ping respond, one PC of my LAN is up…

To re-start the computer in the morning, I use the BIOS RTC alarm (the thing you have by pressing F1 or ESC on reboot). You could also add a script/a program on each of your computers to send the magic packet to your home server to wake it by lan (see “wake on lan” on google).

This script can take any command. But if you want to do shutdown like proposed in the title, you can use :

[code]sudo ./autoshut “poweroff” 10.0.0.1[/code]

Where 10.0.0.1 is your local IP adress. To compile the program, simply use (after saving the code as “autoshut.c”) : [code]gcc -o autoshut autoshut.c[/code]

In my case, I wanted to launch the command only after midnight, so I used cron. Cron will launch that command every 5 minutes from midnight to eight o’clock. So if I stay up late, my server won’t shutdown if my own computer is not down too. That’s the whole purpose.

The line in my crontab :

[code]0,10,20,30,40,50 1,2,3,4,5,6,7 * * * root /home/tom/autoshut/autoshut “poweroff” 10.0.0.1[/code]

Why do all that ? Energy consumption…

[code]#include <stdio.h>
#include <stdlib.h>
#include <regex.h>
#include <string.h>

#define LEASE_FILE “/var/lib/dhcp/dhcpd.leases”
#define DHCP_CONFIG_FILE “/etc/dhcp/dhcpd.conf”

int in_array(char** ar, char* str) {
int i = 0;
while (ar[i] != NULL) {
if (strcmp(ar[i],str) == 0) return 1;
i++;
}
return 0;
}

char* extractIP (char* filename, char** list, int* listNum) {
FILE *pfile;

pfile = fopen(filename, “rb”);

if(pfile == NULL){
printf(“Sorry, can’t open %s\n”, filename);
return ‘\0’;
}
regex_t reg;
int err = regcomp (&reg, “(10\\.[0-1]\\.0\\.([1-9]|[0-9]{2,3}))”, REG_EXTENDED);
if (err != 0)
{
printf(“ERREUR\n”);
return ‘\0’;
}
char ligne[255];

while(!feof(pfile)) {
fgets(ligne, 254 ,pfile);
int match;
size_t nmatch = 0;
regmatch_t *pmatch = NULL;

nmatch = reg.re_nsub;
pmatch = malloc (sizeof (*pmatch) * nmatch);
match = regexec (&reg, ligne, nmatch, pmatch, 0);
if (match == 0)
{
char *ip = NULL;
int start = pmatch->rm_so;
int end = pmatch->rm_eo;
size_t size = end – start;

char* str = malloc(sizeof(char) * 15);
strncpy (str, &ligne[start], size);
str[size] = ‘\0’;

if (!in_array(list, str)) {
list[*listNum] = str;
printf(“%s\n”, str);
(*listNum)++;
}

}

}

fclose(pfile);
regfree(&reg);
}

int ping(char* address) {

char cmd[30] = “ping -W 1 -q -c 1 “;
strcat(cmd,address);
int ret=system(cmd);
printf(“\nResultat : %d\n\n”,ret);
return !ret;
}
/*
TODO : maybe an option?
int checkCableStatus(const char* interface) {
/sys/class/net/eth0/carrier
}*/

int main(int argc, char** argv) {

if (argc <= 2) {
printf(“Usage : %s Command Local-IP [Local-IP-2]\n\tCommand : a command to execute if ping does not work\n\tLocal-IP : Ip to ignore\n\tLocal-IP-2 : Optional second ip to ignore”,argv[0]);
return -1;
}
int listNum = 0;
char** list = malloc(sizeof(char*) * 255);
extractIP(DHCP_CONFIG_FILE, list, &listNum);
extractIP(LEASE_FILE, list, &listNum);
int i = 0;
while (list[i] != NULL) {
if (strcmp(list[i],argv[2])!=0 && (argc==3 ||strcmp(list[i],argv[3])!=0)) {
if (ping (list[i])) {
printf(“%s responded. Command aborted !\n”,list[i]);
return EXIT_SUCCESS;
}
}
i++;
}
system(argv[1]);
return EXIT_SUCCESS;
}[/code]