ORGANISATION/COMPANY
Université catholique de Louvain
Institute of Information and Communication Technologies, Electronics and Applied Mathematics (ICTEAM)
RESEARCH FIELD
Networking, Systems, High-speed packet processing, SmartNICs, P4, NFV
MINIMUM REQUIRED QUALIFICATIONS
The candidate must have obtained a PhD in computer science before the start date.
APPLICATION DEADLINE
Open (continuous screening process), starting ASAP
LOCATION
Belgium › Louvain-la-Neuve
TYPE OF CONTRACT
Post-Doc fellowship for 1+1 year (yearly contract)
2 years starting 1/1/2026
JOB STATUS
Full-time
HOURS PER WEEK
38
OFFER DESCRIPTION
The applicant will join the ENSG to work on leading-edge research topics in crossroad of networking and systems to build a sustainable IT infrastructure. The group is composed of the PI and 5 PhD students, and 2 post-docs.
The post-doc will join the PI’s group to conduct research on thematics that fit the PI’s area of expertise. The applicant will also be expected to advise master students and take a leading role with PhD students. The exact project is open to discussion, but the following project is proposed and describes well the overall direction of the lab.
Internet was designed at a time when computers were monolithic devices, transferring data over a network of routers and switches. This paradigm does not match the reality of today’s devices, which are composed of several elements of different nature (CPU cores, RAM, storage, NICs, GPU, etc). You will join the study of the fundamental challenges for the Internet to catch up with this shift of paradigm. Much like atoms were later refined into a set of particles, the communications of hosts must be reconsidered to enable the next leap in the Internet evolution.
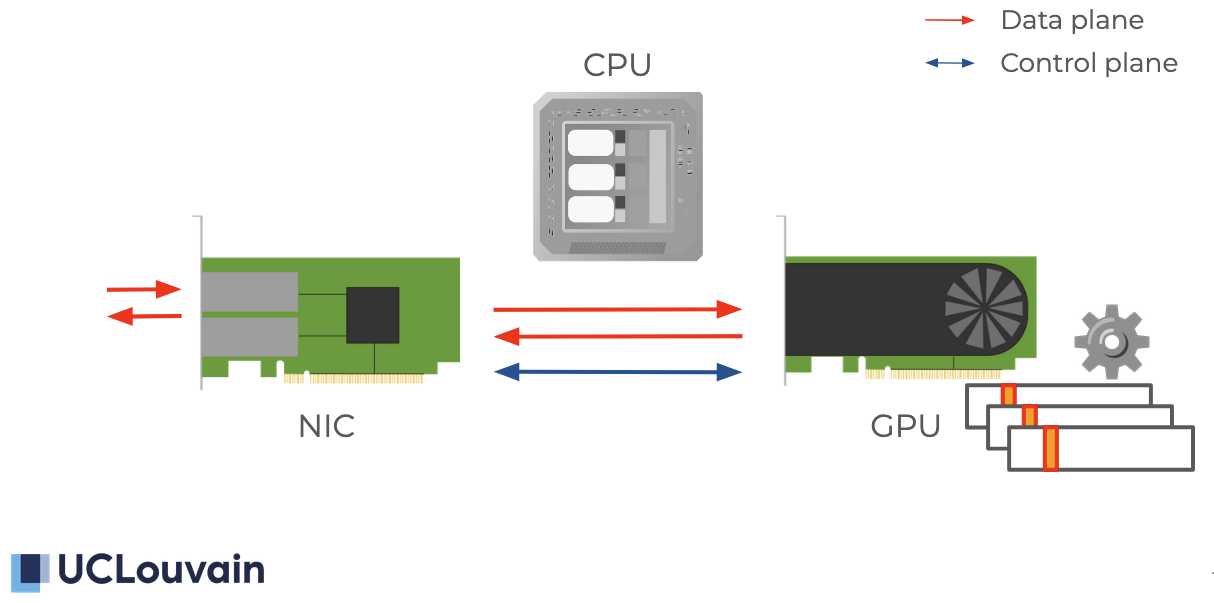
We will examine the newfound programmability of the network, i.e., P4 switches and Smart NICs, to enable sub-atomic communications over the Internet by delegating the intelligence out of the end “hosts”.
The Smart NIC of a host may essentially act as a transparent multiplexer for the sub-devices of the host, bypassing unneeded CPU transfers, and saving time and energy. The Smart NIC will be aware of power-conservative strategies when assigning requests to cores. The group is also conducting research on efficient CPU-aware software pipelines using dynamic compilation to avoid cache and branch misses.
Programmable switches will similarly act as coordinators of the streams through the edge. They will also lead the transfers toward the right particles among the increasingly disaggregated datacenter’s resources that are serving a provider’s content. To overcome ossification, they may expose information and negotiate a behavior for each particle’s streams to reach one possible servicing entity through the best paths. It will be possible without going back to the “ends”, and therefore enable particle-to-particle encryption as well as network efficiency.
The resulting low latency communication will enable future use cases such as cloud gaming and latency-critical workloads, connecting nearby particles that are getting virtually closer thanks to 5G and fiber connectivity. In the long-term, the vision enforced by the group will bring back competitiveness to the Internet by standardizing the means for such next-generation sub-atomic communication.
SKILLS/QUALIFICATION
- Published in known conference in the field (CoNEXT, NSDI, SIGCOMM, IMC, PAM, …) or journals (ToN, SIGCOMM CCR, TNSM, …)
- Good comprehension of computer systems, operating systems. Knowledge of techniques like eBPF, kernel-bypass, Xilinx FPGA ecosystem, DPDK, … is a plus
- Ease with low-level programming in C and/or Rust
SUBMISSION
Please send to tom.barbette@uclouvain.be:
(a) Curriculum vitae;
(b) A letter of motivation;
(c) Links to Masters and PhD thesis (If already defended);
(d) List of publications and links to PDF (not behind a paywall);
(e) If applicable, links to examples of personal software contributions.
REQUIRED LANGUAGES
ENGLISH: at least B2 (upper intermediate)
French is not required
Other positions
See the range of possibilities at the Efficiency of Networked Systems Group