You can use mine as you wish, I tried to find the original authors and the appropriate license whenever I could. Don’t hesitate to send me your own.


You can use mine as you wish, I tried to find the original authors and the appropriate license whenever I could. Don’t hesitate to send me your own.
I’m pleased to announce Retina has been accepted to appear at SIGCOMM at the end of the month ! It is the result of a pleasant collaboration with Gerry Wan, Fengchen Gong and Zakir Durumeric from Stanford.
Retina enables high-speed network forensics by building a binary tailored to a specific experiment written in Rust. It provides convenient filtering capabilities to easily answer questions such as “Is the TLS SNI really random?” or “How many TLS handshake are destined to Netflix?”. Tested at up to 160Gbps with a commodity server on a Stanford traffic TAP, it supports 5-100x higher traffic rates than standard “bloatware” IDSes.
I’m delighted to announce I’ll start as assistant professor on the 1st of September in the INGI department of the ICTEAM, EPL faculty at UCLouvain. Right where I am currently conducting my post-doc.
I’ll continue my research on high-speed networking and programmable networks (including Smart NICs) while taking care of multiple lectures. Stay tuned for exciting news !
It is possible to use MPTCP, but WSL2 uses a virtual interface that prevents advertising multiple paths. There might be a solution using multiple forwarded ports but I haven’t been able to use it yet.
Install Ubuntu in WSL2 (simply look for Ubuntu in the Microsoft Store)
Windows will automatically turn off wifi when Ethernet is plugged in. If you want to try MPTCP over Wifi + Ethernet (or 4G through USB, all the same) you must disable this behavior :
1. Open Registry Editor.

2. Go to HKEY_LOCAL_MACHINE\Software\Policies\Microsoft\Windows\WcmSvc\Local.

3. Create/change the fMinimizeConnections registry DWORD to 0.

4. Close Registry Editor and reboot.
sudo apt install build-essential flex bison libssl-dev libelf-dev pahole
git clone https://github.com/microsoft/WSL2-Linux-Kernel.git
cd WSL2-Linux-Kernel
cp Microsoft/config-wsl .config
Edit .config and change “#CONFIG_MPTCP is not set” by CONFIG_MPTCP=y
make -j4
cp arch/x86/boot/vmlinux.bin /mnt/c/vmlinux
Then shut down WSL in a CMD window:
wsl --shutdownAnd to boot in your new kernel add a file in C:\Users\$USER\.wslconfig
[wsl2]
kernel=C:\vmlinuxThis is to get the “mptcpize” command to run a legacy TCP application with mptcp
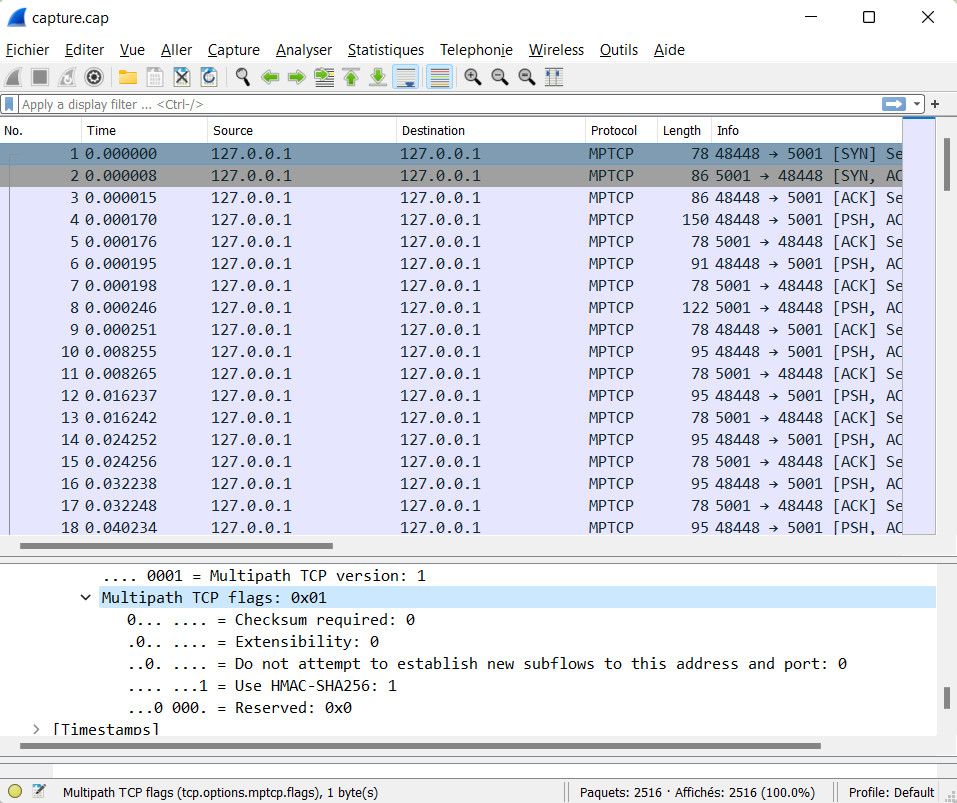
sudo apt install mptcpdsudo apt install iperf
sudo tcpdump -i lo -w capture.pcap
mptcpize run iperf -s
mptcpize run iperf -c 127.0.0.1 -b 1k -l 1Then open capture.pcap with wireshark and you should see MPTCP instead of TCP 🙂
[todo!]
Data centers increasingly deploy commodity servers with high-speed network interfaces to enable low-latency communication. However, achieving low latency at high data rates crucially depends on how the incoming traffic interacts with the system’s caches. When packets that need to be processed in the same way are consecutive, i.e., exhibit high temporal and spatial locality, caches deliver great benefits.
In this paper, we systematically study the impact of temporal and spatial traffic locality on the performance of commodity servers equipped with high-speed network interfaces. Our results show that (i) the performance of a variety of widely deployed applications degrade substantially with even the slightest lack of traffic locality, and (ii) a traffic trace from our organization reveals poor traffic locality as networking protocols, drivers, and the underlying switching/routing fabric spread packets out in time (reducing locality).
To address these issues, we built Reframer, a software solution that deliberately delays packets and reorders them to increase traffic locality. Despite introducing μs-scale delays of some packets, we show that Reframer increases the throughput of a network service chain by up to 84% and reduces the flow completion time of a web server by 11% while improving its throughput by 20%.

Despite old threads that can be seen on VOO’s forum, VOO do not seem to use SLAAC in bridge mode (anymore?), but DHCPv6. Also VOO only gives a /64 prefix so you can’t do internal subnets 🙁
Important: my outgoing (WAN) interface directly connected to the VOO modem in bridge mode is enx000ec6ec03b3 . My internal LAN interface is br0 (it’s a bridge between my actual eth0 LAN interface and a WiFi access point using hostapd, but that’s for another day).
This tutorial assumes Ubuntu 18.04:
sudo apt install wide-dhcpv6-client
sudo vi /etc/wide-dhcpv6/dhcp6c.conf
interface enx000ec6ec03b3 {
  send ia-na 1;
  send ia-pd 1;
  request domain-name-servers;
  request domain-name;
  script "/etc/wide-dhcpv6/dhcp6c-script";
};

# Only for prefix delegation
id-assoc pd 1 {
  prefix-interface br0 { #internal facing interface (LAN)
    sla-id 0; # subnet. Combined with ia-pd to configure the subnet for this interface.
    ifid 1; #IP address "postfix". if not set it will use EUI-64 address of the interface. Combined with SLA-ID'd prefix to create full IP address of interface.
    sla-len 0; # Number of prefix bits assigned. Sadly this is 0 with voo...
    };
  };

  id-assoc na 1 {
  # id-assoc for eth1
};
sudo vi /etc/default/wide-dhcpv6-client
INTERFACES="enx000ec6ec03b3"sudo service wide-dhcpv6-client restart
At this point you should get an IPv6 address:
enx000ec6ec03b3: flags=4163<UP,BROADCAST,RUNNING,MULTICAST>  mtu 1500
        inet 109.89.XXX  netmask 255.255.255.0  broadcast 109.89.XXXX
        inet6 2a02:2788:XXXXXXXXX:8458  prefixlen 128  scopeid 0x0<global>
        inet6 fe80::20e:c6ff:feec:3b3  prefixlen 64  scopeid 0x20<link>
        ether 00:0e:c6:ec:03:b3  txqueuelen 1000  (Ethernet)
        RX packets 1358557038  bytes 1701875645905 (1.7 TB)
        RX errors 0  dropped 0  overruns 0  frame 0
        TX packets 648168501  bytes 176987273193 (176.9 GB)
TX errors 0 dropped 0 overruns 0 carrier 0 collisions 0Actually enable the prefix delegation with radvd:
sudo apt-get install radvd
sudo vi /etc/radvd.conf
interface br0 # LAN interface
{
  AdvManagedFlag off; # no DHCPv6 server here.
  AdvOtherConfigFlag off; # not even for options.
  AdvSendAdvert on;
  AdvDefaultPreference high;
  AdvLinkMTU 1280;
  prefix ::/64 #pick one non-link-local prefix assigned to the interface and start advertising it
  {
    AdvOnLink on;
    AdvAutonomous on;
  };
};
sudo service radvd restart
Some configuration is taken and adapted from https://www.ipcalypse.ca/?p=204
After encountering novel challenges arising at 100G speeds, a follow-up longer version of our MiddleClick paper has been published in the IEEE/ACM Transaction on Networking journal in 2021 with hardware offloading, and an improved algorithm for combining sessions.
The code has been reverted into FastClick, allowing to have unique state management for multiple VNFs, automatically combined. On top of this session system, one can easily modify TCP or HTTP streams on the fly without full termination!
Check out the paper ! The code has been merged to FastClick. The experiments are fully reproducible and described here. You can also check the ToN page.
In this journal version, we extended our conference paper with additional, peer-reviewed material:
Check out the paper in open access !
Georgios P. Katsika, Tom Barbette, Dejan Kostić, JR. Gerald Q. Maguire, Rebecca Steinert
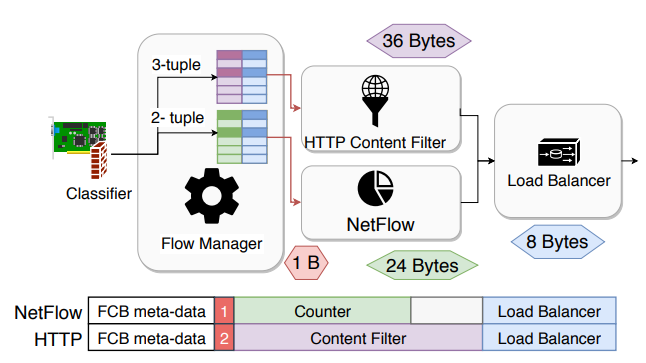
The NSDI version of Metron supported the integration of blackbox network functions (NFs) using ring buffers. This choice limited Metron’s applicability, as real networks might contain hardware blackboxes (also known as middleboxes) or closed-source blackbox binaries running inside virtual machines (VMs) or containers. In this extended journal version published in ACM Transaction on Computer Systems, we put special effort on integrating these important blackbox types into Metron, while maintaining Metron’s hardware-level performance.
This integration was not trivial as it involved tedious low-level system aspects related to (i) efficiently dispatching packets without introducing unnecessary inter-core communication and (ii) techniques to allow high-speed service chaining. These were key principles of Metron that we wanted to maintain. Moreover, we incorporated the latest functionalities of modern 100 GbE NICs, such as single root I/O virtualization (SR-IOV) that enables physical to virtual NIC dispatching, avoiding the need for software switching. Metron instructs the physical NIC to tag the packets according to the core associated with a traffic class by the controller. The tag can then be used to dispatch packets to queues just as a Metron agent does.
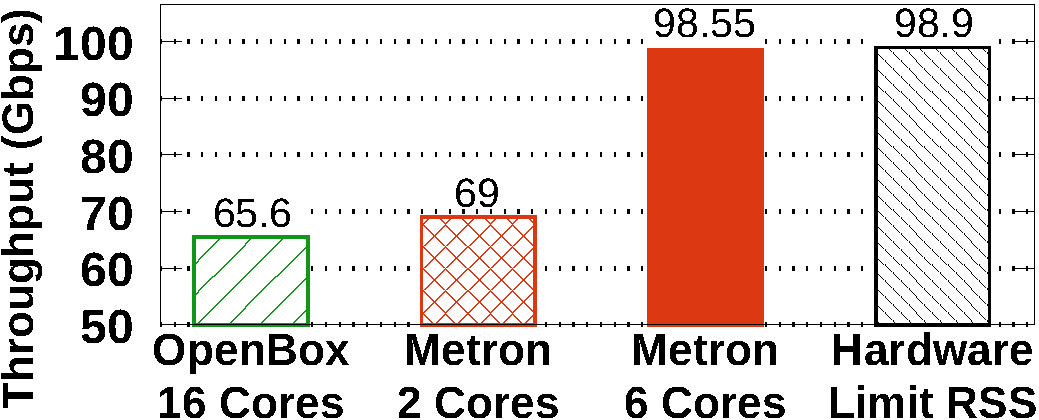
As appeared in USENIX NSDI 2018, the original Metron system demonstrated an experiment on dynamic scaling at 10 Gbps. 100 GbE deployments are becoming the new commodity. Therefore, we put substantial effort on refining Metron’s scaling algorithm. Part of this algorithm uses our new method for deriving the load of a CPU core even when this core performs NIC polling (e.g., using DPDK poll mode drivers).
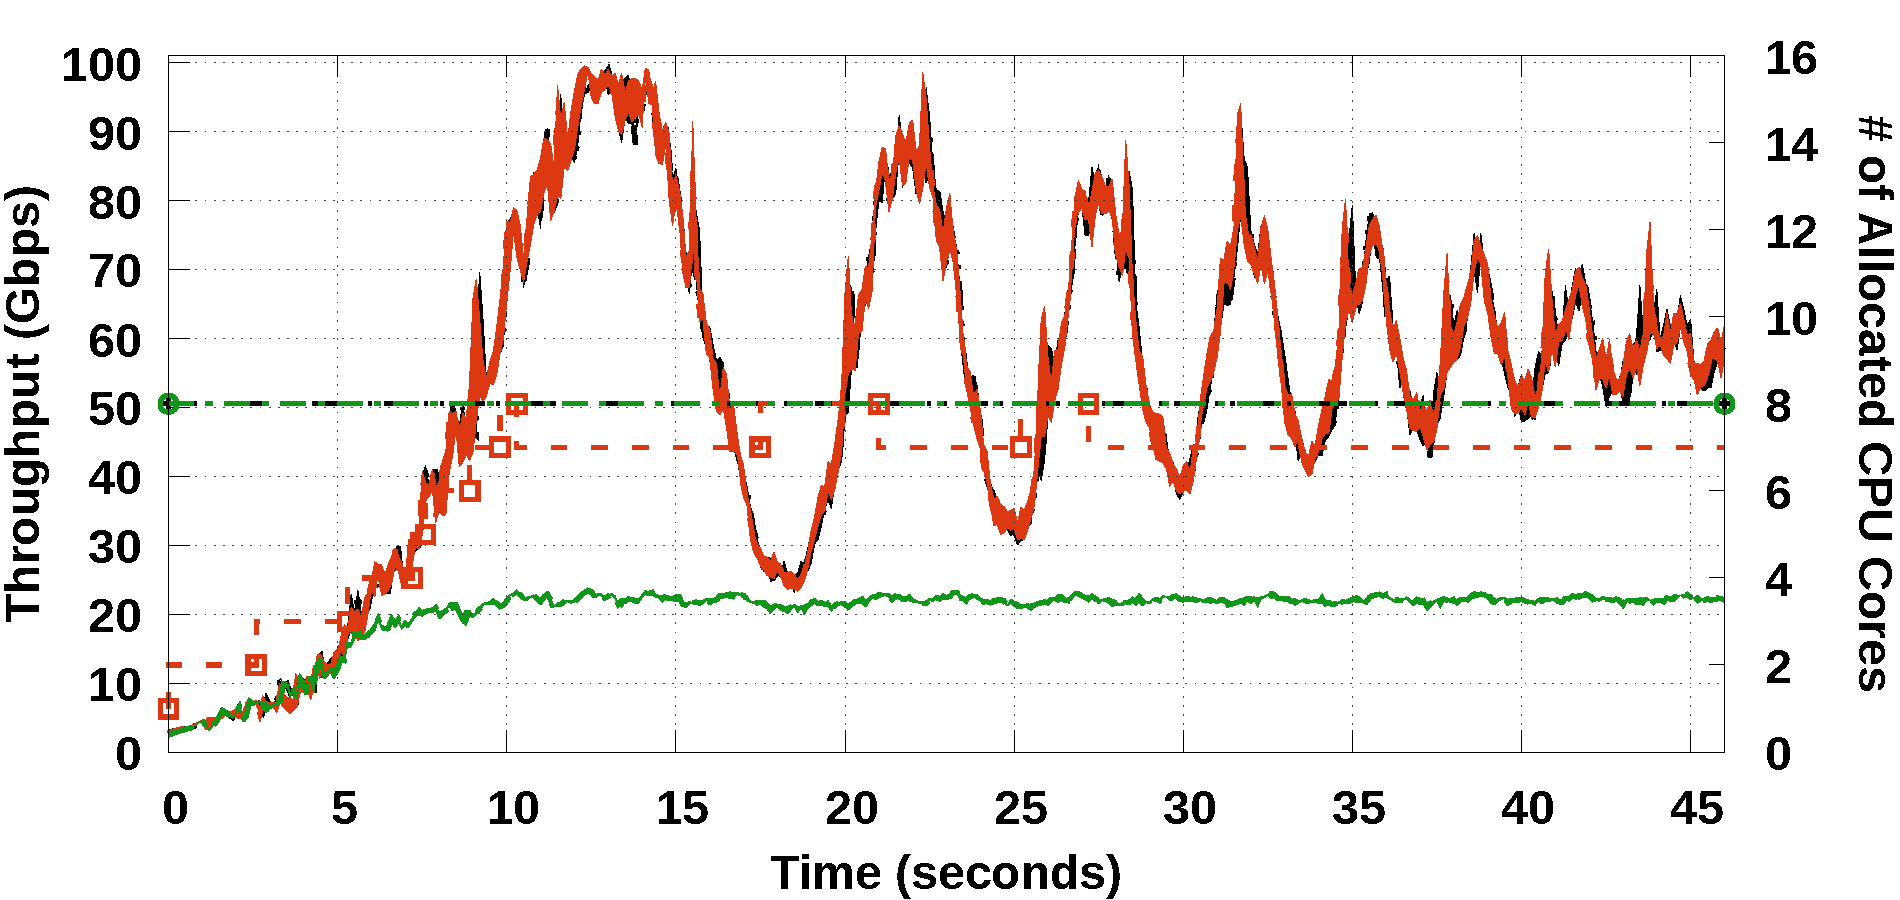
The 100 GbE testbed used in the NSDI version of Metron exhibited hardware limitations that prevented Metron from reaching line-rate performance. In this journal, we repeated the same experiment on two additional testbeds: First we upgraded the 100 GbE NICs of the original testbed (i.e., replacing the Mellanox ConnectX-4 with newer Mellanox ConnectX-5 NICs) and managed to increase the maximum throughput at 85 Gbps (76 Gbps was the previous limit). Then, we also upgraded the servers of the testbed using new workstations with Intel’s Skylake hardware architecture (the old servers used Intel’s Haswell hardware architecture) and managed to achieve line-rate 100 Gbps packet processing.
The paper also presents a dozen other novelties compared to the NSDI version, so check it out!
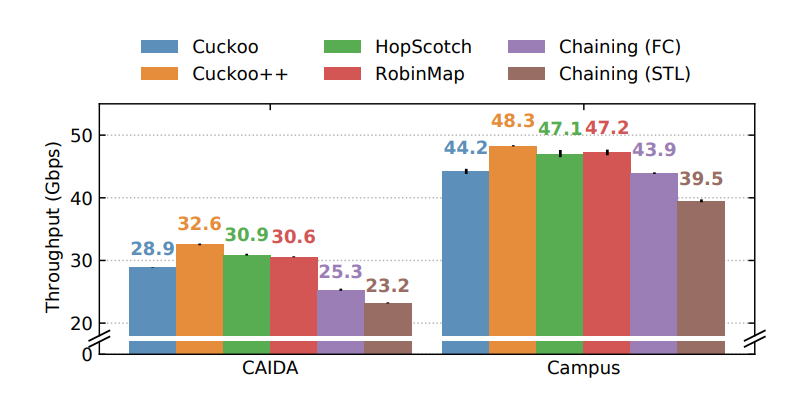
Our paper “High-speed Connection Tracking in Modern Servers” will be presented by Massimo Girondi at the IEEE HPSR 2021, the 22nd International Conference on High-Performance Switching and Routing.
We have analyzed the performances of six different Hash Tables implementations, studying how to scale them across multiple cores and how to efficiently remove expired entries, benchmarking them with up to 100 Gbps traffic.
This is joint work Marco Chiesa and Massimo Girondi, the first author.
Read the paper here.