GitLab with Docker : Fixing “Error: PG::ConnectionBad” or “DETAIL: The data directory was initialized by PostgreSQL version 9.6, which is not compatible with this version 11.7.”

An issue I had where I could not find any fix online. The closest help I could find was this blog post : https://gotanbl.com/foss/how-update-gitlab-in-docker/, but there are multiple mistakes in the article, and the author is not reachable to fix them, so I’ll put the main trivia here…

The root of the issue (in my case) is that updating GitLab (with docker at least) is quite cumbersome. If you run it almost every week, then you can always upgrade to “latest”. If you do it from time to time, you have to upgrade from minor to latest minor then to first major, then to latest minor, then first major etc… And there is no way to do that automatically. So sometimes, running the “usual command” won’t work.

The problem which leads to this error is that the Postgresql database version will only be updated on some versions. If you skip the right one, then you’ll never update and all subsequent updates will break…

Worst, you’ll end up being told to run some commands to do this and that… However the problem is that the docker container will die as it fails to start. So you won’t be able to enter those commands.

The solution

First, note your current version:

sudo docket exec -it gitlab bash
cat /opt/gitlab/version-manifest.txt |grep gitlab-ce|awk '{print $2}'

Then, stop and remove the container. It’s safe, as the real files, db, etc are kept in the $GITLAB_HOME:

sudo docker exec -t gitlab gitlab-backup create
sudo docker stop gitlab
sudo docker rm gitlab

Basically, you’ll have to follow a specific upgrade path that can be found at : https://docs.gitlab.com/ce/update/#upgrade-paths

At the time of writing, this is the path:

8.11.x -> 8.12.0 -> 8.17.7 -> 9.5.10 -> 10.8.7 -> 11.11.8 -> 12.0.12 -> 12.1.17 -> 12.10.14 -> 13.0.14 -> 13.1.11 - > 13.x (latest)

So if your version is 11.10, you’ll have to upgrade at 11.11.8, and continue up to the latest.

To update to a version, do the following.

Verify the command to run the container matches what you used to install GitLab in the first place, you should re-use exactly the same command, only the last $VERSION should change:

export GITLAB_HOME=/srv/gitlab
sudo docker run --detach --hostname gitlab.tombarbette.be --env GITLAB_OMNIBUS_CONFIG="external_url 'https://gitlab.tombarbette.be/'; gitlab_rails['gitlab_shell_ssh_port'] = 2022; " --publish 2443:443 --publish 2080:80 --publish 2022:22 --name gitlab --restart always --volume $GITLAB_HOME/config:/etc/gitlab --volume $GITLAB_HOME/logs:/var/log/gitlab --volume $GITLAB_HOME/data:/var/opt/gitlab gitlab/gitlab-ce:$VERSION

The $VERSION should be the version with “-ce.0”, so for instance 11.11.8-ce.0, this is the docker container version that can be found at https://hub.docker.com/r/gitlab/gitlab-ce/tags?page=1&ordering=last_updated

Normally, when you launch that command the update for postgresql should be done automatically. If somehow you start hearing complaints, you can force the upgrade to the version XXX with:

gitlab-ctl pg-upgrade -v XXX

Where XXX is the database version.

After launching a specific version, you have to wait for GitLab to completely start, to be sure all migration was terminated.

If in troubles, you might want to check the logs with :

sudo docker logs -f gitlab

Typically the logs in $GITLAB_HOME starts to be meaningful when this problem is fixed and gitlab completely started, so it was not helpful for me.

So at this point, go back to the version list above and advance one by one…

It may seem crazy, but now to avoid that you have no choices than updating every weeks… Or you’ll have to play with versions again…

Now, I run a cron script that will save and update GitLab every week. Anyway, GitLab is an horror memory-wise and slows down with time. So removing and re-adding the container every week is actually helpful…

#!/bin/bash
sudo docker exec -t gitlab gitlab-backup create
sudo docker stop gitlab
sudo docker rm gitlab
export GITLAB_HOME=/srv/gitlab
sudo docker run --detach --hostname gitlab.tombarbette.be --env GITLAB_OMNIBUS_CONFIG="external_url 'https://gitlab.tombarbette.be/'; gitlab_rails['gitlab_shell_ssh_port'] = 2022; " --publish 2443:443 --publish 2080:80 --publish 2022:22 --name gitlab --restart always --volume $GITLAB_HOME/config:/etc/gitlab --volume $GITLAB_HOME/logs:/var/log/gitlab --volume $GITLAB_HOME/data:/var/opt/gitlab gitlab/gitlab-ce:latest

FOSDEM’21: FastClick and beyond…

Early February we presented a talk at FOSDEM, a huge Open-Source gathering with my colleague Alireza Farshin. The video is now released!

In the talk we present FastClick with a short demo, do a round of existing alternative modular framework (VPP and BESS mainly) and then discuss the future of software dataplanes, which we believe our recent work PacketMill starts to address.

We mainly show how FastClick is still really up-to-date with competition and goes beyond sota with PacketMill’s enhancements. We also re-did an experiment at 100G showing how FastClick now improves Click by more than 30x in a forwarding configuration. This is because we continued to maintain FastClick since nearly 6 years now and we do consider pull requests, and integrate recent research while good old Click itself is sadly stalling since a decade now. I will do a blog post about the state of FastClick in the next weeks.

I also bought the www.fastclick.dev domain to start a little showcase website. For now it redirects to GitHub. Feel free to help 🙂

Links : video ; slides ; page

A poster of our latest work, CrossRSS, a Stateless CPU-Aware Datacenter Load-Balancer

Today we will present a poster of our latest work, at CoNEXT’20 : CrossRSS! CrossRSS is a load-balancer that spreads the load uniformly even inside the servers. It uses knowledge of the dispatching done inside the servers, RSS, to purposely select less-loaded cores without any server modification, or inter-core communications on the server. Learn more by watching the short video!

The poster session will be held on the 4th of December, 2:30 CET on the Mozilla VR Hub

Extended Abstract ; Hub ; Video ; Poster-As-Slides

Our latest paper “Cheetah”, a load balancer that guarantees per-connection-consistency

Cheetah is a new load balancer that solves the challenge of remembering which connection was sent to which server without the traditional trade off between uniform load balancing and efficiency. Cheetah is up to 5 times faster than stateful load balancers and can support advanced balancing mechanisms that reduce the flow completion time by a factor of 2 to 3x without breaking connections, even while adding and removing servers.

More information at https://www.usenix.org/conference/nsdi20/presentation/barbette.

Dynamic DNS with OVH

It may not be a clear thing, but OVH allows to have your own Dynamic DNS if you rent a domain name, surely a better thing than the weird paid website from dyndns.org. I will explain how to handle the update with Linux using ddclient.

On the manager

Connect to https://www.ovh.com/manager/web/#/configuration/domain/ , select your domain name, and create a new dynhost with the button on the right.

Enter a sub-domain name such as “mydyn” (.tombarbette.be), and add the actual IP for now, or just 8.8.8.8 for the time being.

Then it is not finished, you have to create a login that will be able to update that dns entry. Select the second button to handle accesses and create a new login.

Select a login, probably the name of the subdomain, the subdomain itself, and a password.

On the server

sudo apt install ddclient

Then edit /etc/ddclient.conf

protocol=dyndns2
use=web,web=checkip.dyndns.com
server=www.ovh.com
login=tombarbette.be-mydns
password='password'
mydns.tombarbette.be

Just do “sudo ddclient” to update once then “sudo service ddclient restart” to get it updated automatically.

May this be helpful to someone, personally I just forget it all the time so I wanted to leave a post-it somewhere.

Our new paper RSS++: load and state-aware receive side scaling

I’m delighted to announce the publication of our latest paper titled “RSS++: load and state-aware receive side scaling” at CoNEXT’19.

Abstract

While the current literature typically focuses on load-balancing among multiple servers, in this paper, we demonstrate the importance of load-balancing within a single machine (potentially with hundreds of CPU cores). In this context, we propose a new load-balancing technique (RSS++) that dynamically modifies the receive side scaling (RSS) indirection table to spread the load across the CPU cores in a more optimal way. RSS++ incurs up to 14x lower 95th percentile tail latency and orders of magnitude fewer packet drops compared to RSS under high CPU utilization. RSS++ allows higher CPU utilization and dynamic scaling of the number of allocated CPU cores to accommodate the input load while avoiding the typical 25% over-provisioning.

RSS++ has been implemented for both (i) DPDK and (ii) the Linux kernel. Additionally, we implement a new state migration technique which facilitates sharding and reduces contention between CPU cores accessing per-flow data. RSS++ keeps the flow-state by groups that can be migrated at once, leading to a 20% higher efficiency than a state of the art shared flow table.

Paper ; Video ; Slides

Do HUAWEI CloudEngine switches support OpenFlow?

No, no and no.

Despite what the ONF says (https://www.opennetworking.org/product-registry/) it is not. Huawei’s OpenFlow implementation is actually broken. The very first  HELLO OpenFlow message is broken. It reports support for OpenFlow 1.4 in the HELLO message, but the rest of the message is absolutely not structured as defined in the standard.

After contacting all parties, it is clear that nobody will move about that, especially HUAWEI which wants to sell the Agile controller for a high price. It would appear that an old firmware, announcing OpenFlow 1.3 was compliant at the certification time but only if using an old software compliant with OpenFlow 1.3.0 and not newer, as starting with 1.3.1 after that the message is broken too.

Funny, I recently bought a HUAWEI smartphone that had trouble with SmartWatches. The seller told me that most smartwatches worked with every phones except Huawei ones, because their bluetooth implementation is not compliant. Seems to be a habit…

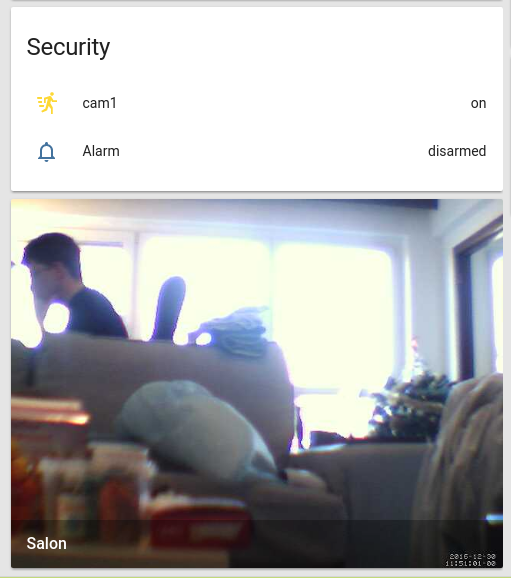
Home-Assistant : live camera feed and motion detection with a USB camera using motion

I want to display my webcam feed on home assistant. That’s easy and well explained on home assistant’s website. However they do not tell how to implement a motion detection system at the same time.

First step : set up the camera live feed as explained in the docs

In your configuration.yaml

[code]camera:
– platform: mjpeg
mjpeg_url: http://localhost:8081
name: Salon[/code]

Install motion :

[code]sudo apt-get install motion[/code]

Configure /etc/motion/motion.conf (change these values 🙂

[code]daemon on
stream_port 8081
stream_quality 80
stream_maxrate 12
stream_localhost on[/code]

And then restart motion :

[code]sudo service motion restart[/code]

And home assistant, then the webcam should appear ! Yeah !

Now the motion detection. The method I took is to use the mqtt protocol. A binary sensor will be the state of motion detection, motion will publish updates to the given topic to say if motion is on or off, and home assistant will subscribe to it.

Add this in your HA configuration.yaml

[code]mqtt: #I pass the mqtt setup process
broker: 127.0.0.1
port: 1883
client_id: home-assistant
keepalive: 60
protocol: 3.1

binary_sensor:
– platform: mqtt
state_topic: “living_room/cam1”
name: cam1
sensor_class: motion[/code]

Install mosquitto-clients :

[code]sudo apt-get install mosquitto-clients[/code]

The commande to start a motion event is :

[code]mosquitto_pub -r -i motion-cam1 -t “living_room/cam1” -m “ON” [/code]

-r sets the retain flag
-i is just a client id
-t is the topic, which should match the configuration in mqtt
-m Sets the message content, ON for motion being detected, OFF for a still image.

Then we have to update motion.conf accordingly:

[code]on_event_start mosquitto_pub -r -i motion-cam1 -t “living_room/cam1” -m “ON”
on_event_end mosquitto_pub -r -i motion-cam1 -t “living_room/cam1” -m “OFF”[/code]

And restart motion ! And it’s finished !

PROXIMUS_AUTO_FON automatic connexion on linux using wpa_supplicant

If you understand this title, you don’t need more explanation :

/etc/network/interfaces
auto wlan1
iface wlan1 inet dhcp
wpa-conf /etc/wpa_supplicant/wpa_supplicant.conf

/etc/wpa_supplicant/wpa_supplicant.conf
ctrl_interface=/var/run/wpa_supplicant

network={
ssid="PROXIMUS_AUTO_FON"
scan_ssid=1
key_mgmt=WPA-EAP
eap=TTLS
identity="LOGIN@proximusfon.be"
password="PASS1234"
phase2="auth=MSCHAPV2"
}

Some may ask why some people would want to do that… I’m now using Voo, but I use my parent’s FON login when voo crash. My current project is towards aggregating the two links by load balancing, or at least have some kind of automatic failover. The more interesting part would be to switch to “FON only” when I reach my 100Gb limit…

Install and share the Canon Pixma MX395 Scanner with Sane

Found a Pixma MX395 at 27€ yesterday… It’s quite easy to find the Canon debian package to install the printer (use these one and not the included) and “scangearmp” which is the specific tool from Canon to scan, but it is not standard, and do not allow to share your scanner on the network through SANE.

The current version of sane do not support that printer, so you’ll need to use an updated one. Do :

sudo add-apt-repository ppa:rolfbensch/sane-git
sudo apt-get install sane sane-utils libsane

And it’s up !

scangearmp -L should show your scanner :
scanimage -L < ~ [14:04:02] device `v4l:/dev/video0' is a Noname USB2.0 Camera virtual device device `pixma:04A91766_21F9AD' is a CANON Canon PIXMA MX390 Series multi-function peripheral

Also edit /etc/sane.d/saned.cong to add the network subnet which can access the scanner :
10.0.0.0/24
[2a02:578:3fe:8139::]/64

For me. Do not forget the IPv6 address, of course 😉

Then on your client, install sane and edit /etc/sane.d/net.conf to add the server address :
10.0.0.1

And if you run scanimage -L on your client you should now see the remote scanner :
scanimage -L
device `v4l:/dev/video0' is a Noname USB2.0 UVC HD Webcam virtual device
device `net:10.0.0.1:v4l:/dev/video0' is a Noname USB2.0 Camera virtual device
device `net:10.0.0.1:pixma:04A91766_21F9AD' is a CANON Canon PIXMA MX390 Series multi-function peripheral